Sunday, March 23, 2014

Polamatic~Camera+~Glaze~PhotoArtistaSketch~ImageBlender~Leonardo~Phonto~ Working up a new process

Finished Image My Process Below.....
This image started with a simple grab shot of a little flower arrangement on a table at Chick-fil-a when I was killing some time before a Camera Club meeting I was judging. The process evolved as I was working through a few of my favorite apps and one I recently bought Polamatic. The process steps I took are in order below.
1. Camera+ original capture
2. Saturated in Leonardo
3. Image 2 opened in Polamatic and Filtered in Polamatic
4. Image 3 opened in Glaze and masked using the in app purchase mask feature.
5. Image 3 Glazed. Notice the cool effect of paint drips over the masked out border
using the workshop mode in Glaze to achieve a custom Glaze effect..

6. Image 5 opened in PhotoArtista Sketch with sketch effect reduced to
zero so that the paper texture is totally visible, almost completely obscuring the image file.
7. Image 5 and image 6 Blended and selectively masked in
ImageBlender for an aged paper look.

8. Image 7 adjusted for sharpness, saturation and brightness in Leonardo, then opened in Phonto to add the text.
Join me May 4th in Washington, DC for  my full day of Working with Apps in Depth class sponsored by Capital Photography Center where we will process images with cool apps like the ones used here! For more information and registration click here.


Saturday, March 15, 2014

Voice Dream Reader Updated to Version 3.0: Read PDFs in Original Layout and More


Voice Dream Reader is an app for iPhone, iPad, and iPod Touch that supports people who prefer reading in different ways. Voice Dream can read documents from a number of sources with multiple high quality text-to-speech voices. Users can import PDFs, Word documents, text files, webpages, and even Bookshare books into the app. Once the text is loaded into the app you can listen to it using text-to-speech, highlight the text, search for a specific words or phrases, and get definitions for unknown words. Among many other uses, Voice Dream Reader is a terrific Bookshare book reader for students. Voice Dream also works very well with VoiceOver. Now, with newly released Voice Dream Reader version 3.0, new features have been added that makes the app even more useful.

Up until yesterday evening, Voice Dream only supported text. All images and formatting associated with a file were stripped away. With version 3.0 images and formatting within PDF files are retained. Now you can read a PDF in its original layout. Voice Dream still highlights each word as it is read aloud. It is easy to switch between layout view and text view depending on your preferences. Version 3.0 also includes more customization options. Users now have more control over the colors of the highlighting and spacing of the text. An improved web browser has been added that makes adding text from the web quicker and easier. New Ivona text-to-speech voices are also available for purchase in version 3.0.

With large PDF files page loading is slightly slow, but this problem only occur with very large files and does not effect text view performance.

In future updates image support maybe added for Bookshare books or other document types. I also hope iCloud sync will be added in a future update. At school I read my books on my iPhone and make new annotations, but when I get home and start reading on my iPad the annotations are stuck on the iPhone and I must search for the page that I left off on. iCloud sync would make this process much more seamless.

Voice Dream Reader is a must have app for iOS users with print disabilities or anyone who could benefit from reading with text-to-speech. Voice Dream Reader's well developed features make loading, reading, and annotating text easy. Knowing that the app has a developer that is open to feedback and actively developing new features is an added benefit. Voice Dream Reader costs $9.99 on the App Store. Click here to download the app. There is also a lite version of Voice Dream Reader that allows you to try it before you buy.

Click read more to view screenshots of Voice Dream Reader.


Thursday, March 13, 2014

Glaze ~ Transparency Masking ~ ImageBlender ~ BrushStrokes ~ Camera+


1. This is the iPhone image I started to work with in Glaze for the purpose of exploring the mask feature in Glaze. The image was captured with Camera+ with Square crop mode activated and  I had already processed the image with BrushStrokes a newly released App.
About 5 months ago the developers of Glaze added a new masking feature to their app Glaze. In order to access the feature it required an in App purchase so, I purchased it. I really did not have the curiosity to explore the options at that time as I was using ImageBlender, but this Glaze masking feature allows you to accomplish a different process when using the App Glaze with mask mode...so here it goes my attempt to explain its features and benefits as well as some ideas for improvement.
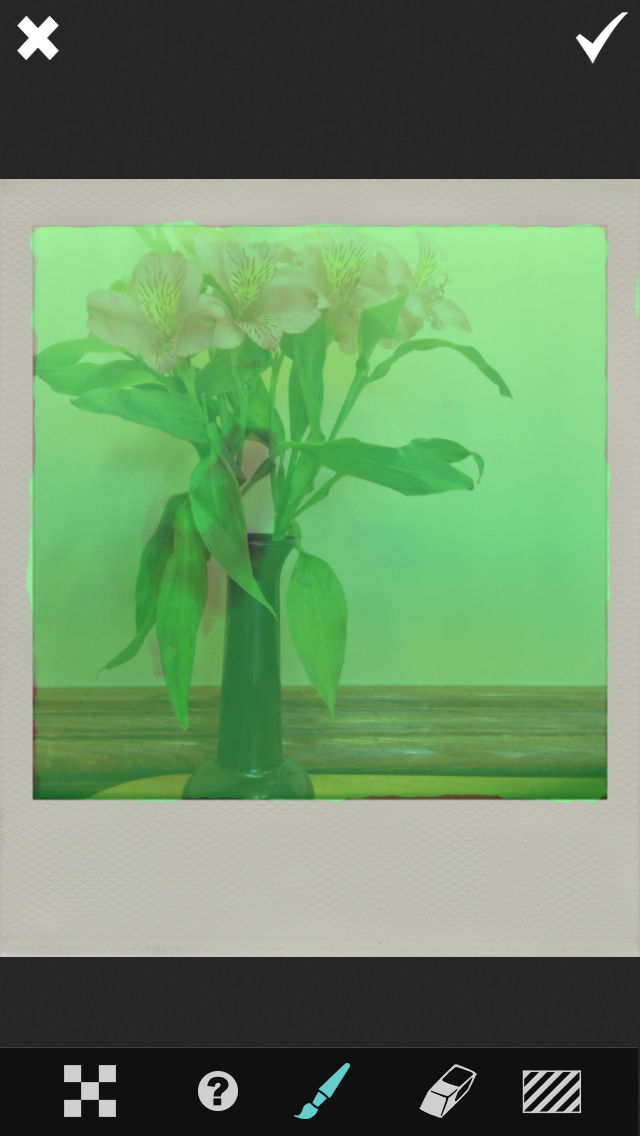
2. Image being masked in mask mode in Glaze.
To select the areas to be masked one paints over the image area with the Brush Icon activated, it is easily seen by the bright green mask.
After purchasing the mask feature a star icon will appear at the bottom of the paint style palettes upon opening the application. When you tab on the star the menu choices appear as in the image 2 above.
3. Transparent mask applied to background of the image.
The cool thing about this mask is that you can save it with a transparent background. To do that you activate the transparent background by tabbing on the checkerboard icon. In order to work in great detail you simply expand the image and the brush becomes smaller relative to the enlarged image There is no brush size or opacity adjustment. The eraser feature works the same way. I woud like an undo button but it is easy enough if you over paint to erase. The one button you do not want to actidentally activate especially after you have spent time painting your mask is the diagonally striped rectangle on the bottom right, it will clear your mask! I wish there was a prompt connected with that saying are you sure you want to clear the mask?Now that you have the mask on a transparent background, you can hit the checkmark in the lower right. This will activate the mask and you can now run it through your favorite glaze filters.
4. Masked image area processed with a Glaze filter with a transparent background.
Notice the star icon changed to reflect a transparent background.
So here is what happens when you process the  mask with you favorite Glaze filter, it applies it to the masked area only...pretty cool!
5. Saved image to camera roll, masked and Glaze processed with transparent background all ready for blending with another file.
The image above is what the saved, transparent masked image looks like in your camera roll.

6. Blended images, the original BrushStrokes image 1 and the Transparent Glaze image 5
This is an image blended in ImageBlender using the original processed image from BrushStrokes  Image 1 and a variation of the Masked Transparent Image 5. When you use the transparent image in ImageBlender there is no further masking required.
7. You can also choose not to use a transparent background using the mask feature and run your image through a Gazed filter right out of the mask feature and Glaze will only apply the Filter to the mask leaving your background in the image.
So five months later, I will say this is a pretty trick feature in Glaze!!! If you would like to work with me on this process, join me on my next day long iPhone workshop, "Working with Apps in Depth" May 4, Sponsored by Capital Photography Center. Click here for more information and registration. Happy Masking!
Depending on the Glaze filter you use the background will change, this is a variant to the image process without the transparent mask activated.


Monday, March 10, 2014

Apple Releases iOS 7.1 with Numerous Accessibility Tweaks


Today, Apple released iOS 7.1 with numerous accessibility improvements. While these features are not as exciting as the accessibility features added in major releases of iOS they still offer advantages for many users. Most of the improvements focus on making the new iOS interface easier to see for people with visual impairments. Turning on bold text now makes the keyboard, calculator, and in app icons bold in addition to text. A new option found under the accessibility menu allows users to turn on button shapes which makes it easier to distinguish text from buttons. In addition to limiting the parallax effect, reduce motion now limits multitasking animations and animations in the weather and messages apps. iOS 7.1 also allows users to darken colors used in apps to make them easier to view and increase the white point of the display to cut down on glare.

Button Shapes
iOS 7.1 also includes a number of VoiceOver bug fixes, but some are still present in iOS 7.1. In addition to accessibility improvements iOS 7.1 includes an important stability improvement that limits a crashing issue that was present in iOS 7. Among other improvements, Touch ID finger print scanning accuracy is also improved for iPhone 5s users.

Users can download iOS 7.1 by going to settings > general > software update.


Saturday, March 8, 2014

Any Developer Can Now Integrate Fleksy's Accessible Keyboard Into Their iOS App


Fleksy is an alternative keyboard for mobile devices including smartphones, tablets, and even smart watches. Fleksy uses predictive software that will guess which word you meant to type even if you mistype every letter. As long as your close to the right letters Fleksy will be able to correctly guess which word you meant to type. This means you don't even have to look at the keyboard. If Fleksy does make a mistake you can easily swipe through alternative suggestions.

Currently, Apple does not officially support third party keyboards to replace the default keyboard on iOS, but developers can get around this limitation by building an alternative keyboard into their app. Today, Fleksy made it easy for developers to built the Fleksy keyboard into their app. The Fleksy keyboard is now available for any iOS developer who wants to include it in their app. This announcement is very exciting because if developers get on board it will give iOS users the choice of which keyboard to use.

Having Fleksy integrated in apps is also a positive for blind and visually users. Fleksy works well with VoiceOver and because Fleksy is so good at predicting which word you are trying to type being able to see the keyboard is not as important. The Fleksy keyboard is much quicker and easier to type on then the default iOS keyboard especially for VoiceOver users.

Unlike Android were you can download Fleksy and use it will all of you favorite apps, each iOS developer will have to build in support for the keyboard. Hopefully, now that Fleksy is available for all iOS developer Fleksy will become ubiquitous on iOS. If you would like to see Fleksy integrated into one of your favorite apps you could contact the developer and ask for Fleksy integration.

To try out Fleksy download the app for iOS or Android. Fleksy is currently available in select apps such as Launch Center Pro. Click read more below to view images and videos of Fleksy.


iPhone Screenshot 2

iPhone Screenshot 3


Wednesday, March 5, 2014

New Painterly App ~ Brushstroke

Capture: Camera+ Processed: Brushstrokes, Leonardo, ImageBlender

From the developers of "ToonCamera" comes Brushstroke! I like it! It has the ability to deliver a high resolution file with a nice group of filter options and editing options, with texture, as well as an option to actually add your personalized signature, not script, your hand written signature. Fun! The app filters are varied and the signature option is easy to use. For $2.99 I think it is definitely worth adding to your App portfolio. It will also be a great app to use for blending back with other files using ImageBlender.
Capture: Camera+ Processed: Mextures, Brushstroke, Leonardo
A few notes of info that I wanted to share about some of my favorite Apps, ImageBlender updated today and if you have been loving it for its past ability to uprez files while blending, using the background image as the largest file, check out the new settings as the default came in using the foreground image to scale the blended image. If you want to revert to the prior workflow then you will need to change it in the settings in the ImageBlender App.

Accidental discovery Ha...maybe I am very late to discover this one!!! But I accidentally figured out how to resize the borders within the Snapseed App. Having been a long time user, of Snapseed and loving their borders, when the App updated after Google purchased Nik, it seemed as though the adjust border option went away or did not function, but this week I was "pinching the screen" when the border filter was open and guess what, it changed the size of the border...so... as with many cool features in apps sometimes the features are not so obvious! Just thought I would share...silly me! Now I will be enjoying using their borders again! My next "Getting Started" in iPhone Photography is this Saturday March 8 at the National Building Museum. For more information and registration click here!
Capture: Camera+ Processed: Brushstrokes, Leonardo