Showing posts with label iPad. Show all posts

Monday, December 21, 2015

How to Print Mailing Labels from an iPhone or iPad

Avery Templates app

How to Print Mailing Labels from an iPhone or iPad

It's Christmas-card time… and that means it's also "Help! I need to print mailing labels!" time. In the olden days it was easy: you used the Address Book program on your Mac (I wrote about printing mailing labels back in 2010). But what if all you have is an iPhone or an iPad? How do you print mailing labels then?

Actually, it's easier than you might think.

First thing you do is you get the Avery Templates Everywhere app from the App Store.

UPDATE October 9th, 2014: the Avery Templates Everywhere iPhone app is not available on the App Store any longer. I don't know when it disappeared but it's not there now. This complicates things. iPad users can download the free Avery Design & Print app but iPhone users are out of luck.

UPDATE November 23rd, 2013: If you're using an iPad, you might want to try the Avery Design & Print app instead. It's a little clumsy but it handles multi-line street addresses, which Templates Everywhere did not. So that's progress.
Hey! Want more tips like this, delivered to your email inbox? Sign up for my mailing list and never miss a post.

(The following was for the Avery Templates Everywhere app-- I am leaving it here for posterity. The Design & Print app has different screens. If you're really stuck email me and I will try to help you.)


When you launch the app you'll see this. Choose "Create Project."
IMG_2119

Next you'll see the GIANT list of Avery label templates. Choose the one corresponding to the labels you're going to use. If you just want to play around in advance of getting your labels try the 5160s. Three across, ten down. Standard as can be.
IMG_2120 IMG_2121

Next, you'll see this screen showing you how your labels are going to lay out. You can drag things around here but they start out with something that works fine for me. All you need to do is choose which contacts you want to print. That's what the "Contacts" button is for. So tap that.
IMG_2122

You'll get a message asking whether Avery can access your contacts (that's nice of them, but it's also required by Apple's iOS). Tap OK. Next you'll see your entire list of contacts. Tap the checkbox to the left of the contacts you want labels for.
IMG_2123 IMG_2124

When you're done, tap "Done," and then tap "Preview." You'll notice by the way that the number of contacts chosen is displayed next to the word "Contacts." If you are trying to fill a sheet of labels it's nice to know how many names you've selected.
IMG_2125mailinglabelpreview

If it looks good to you, tap the Share button That's the curvy white arrow at top right. You'll get three choices.
IMG_2127

Save lets you save your project for later revising (or for printing again). I highly recommend saving your project. You'll have to create an Avery account first but that's easy: email address and a password (NOT your regular email password-- just something for Avery). Print lets you print to an AirPrint-enabled printer. AirPrint is sort of new and only works with certain newish printers so you may be out of luck there. Go ahead and try-- you have nothing to lose. Email is your Ace in the Hole because it lets you email your labels as a PDF to someone who DOES have a printer. Here's what it looks like when you tap Email.
IMG_2128

That's all there is to it. Nothing fancy but it works. If you have an extra label you can make one for me.

Christian Boyce
3435 Ocean Park Boulevard #107
Santa Monica, CA 90405

Monday, November 23, 2015

Happy Thanksgiving


Happy Thanksgiving to one and all. I'll spend my Thanksgiving cooking a turkey in the Primo Kamado cooker on the balcony, doing a little online shopping, and keeping an eye on the key football games. Here is how I do it. You can do it too.

Cooking a turkey in the Primo Kamado
A Primo Kamado is a ceramic cooker, something like a Big Green Egg. I've cooked a lot of turkeys on my Primo over the years and they have all been delicious. Turns out that the preparation and cooking are much more important than the spices. There are probably fifty ways to cook a turkey on a barbeque but here's the one way I do it every single time.

Get your cooker going with plenty of fuel. Your turkey will cook for about three hours, maybe a little longer. Set it up for about 300 degrees F. You don't want flames to touch your turkey so put a pan down on a lower rack to block the flames or just put the coals on one side of your cooker and the turkey on the other. I have an old cookie sheet (a round one) that I put on the lower rack and it catches the drippings and blocks the flames.
  1. Start with a nice fresh turkey. Frozen is OK but if a fresh one is available, get one. I usually pick one that's in the 12 to 15 pound range. If you go too big you won't be able to fit it on the cooker. I've cooked brined turkeys, Butterball turkeys, plain fresh turkeys, and probably some other kinds that I don't remember and they all came out great.
  2. Take out the neck and giblets and do whatever you want with them. That's up to you.
  3. Cut the backbone out, using heavy kitchen scissors or poultry shears. Some people call this "butterflying," some people call this "splaying," some people call it "spatchcocking." Watch this video, and call it anything you want. The video shows how to do it to a chicken but it's exactly the same on a turkey, only harder. You will need some strength. Watch your fingers. The reason you do this is it cuts your cooking time almost in half.
  4. Cut off any extra fat and rinse the turkey off. Pat it dry with paper towels. You will need more paper towels than you thought.
Like I said, the preparation and cooking are more important than the spicing. I've made great turkeys using Dizzy Dust, Grub Rub, Texas BBQ Rub, and Bob Tallman's Ranch Rub. These are all fairly heavy on the brown sugar. You'll need a good bit, maybe half a bottle. You're going to apply rub inside and out, and under the skin, so plan accordingly. Pour a bunch of rub into a coffee cup or some other smallish container and put a spoon in it now because your hands are going to be all slippery pretty soon and you don't want to make a mess of your cupboards if you can help it. While you're at it set out another coffee cup and put an inch or two of olive oil in there. You'll need a brush to apply the oil later so you may as well get that out now.

First, run your fingers under the skin on the breast meat to loosen up the skin as much as possible. If you are careful you can get the skin completely loose from the breast. Get a spoonful of rub and put it onto the breast, under the skin. Do it again on the other side and pat it down with your fingers. You will almost always wish you used a little more rub so this is the time to do it right. Put some more in there.

Next, do the same thing with the thighs. The skin comes loose very nicely and you can dump a good bit of rub onto the thighs, under the skin. This takes a bit of time but it's worth it.

To this point you have not put any rub on the outside of the turkey. It is all under the skin, which is great because the rub you put on the skin isn't going to get into the meat nearly as well as the rub you put down under the skin.

Now put the turkey breast-down, exposing the inside of the bird. Brush the inside of the bird, and any part of the bird that is exposed in this position, with olive oil. There are three reasons for this:
  • It makes the skin brown up very nicely
  • It makes the rub stick to the bird
  • Olive oil makes a lot of stuff better and this is no exception.
After you've brushed everything you can reach with the turkey breast-down, sprinkle rub all over the bird, knowing that you are later going to roll it over and do the other side. Give it a good healthy sprinkling. Like I said, you will usually wish you'd used more.

Now you are almost ready to cook. Hopefully your cooker is ready to go. Put the bird onto the cooker with the breast up.

It will look something like this:

You can see the rub under the skin on the breast.

Take your olive oil and brush everything you can reach. Sprinkle with rub. Yes, the fire is going but it won't be so bad. Work fast.

Your turkey will look like this when it's olive oiled and sprinkled with rub.

Close the lid to the cooker and let time do its magic. A thermometer with a digital read-out outside the cooker will be very handy so get one of those if you can. Put it into the thigh and in a few hours have a look. When it's 170 degrees in the leg your turkey is done. In my experience that's going to take somewhere around three hours. That is probably less time than you expected but that's the whole point of spatchcocking.

It will look something like this when it's ready to come off. I use tongs to lift the turkey but be careful as the legs will be pretty loose and might come off.


Put it on a rack in the kitchen and let it sit for ten or fifteen minutes. It's impossible to carve when it's super hot, so let it cool down a bit. Then, carve it following these instructions. This is the finishing touch and it makes all the difference. Forget about carving it at the table. Carve it in the kitchen and bring out the cut-up meat. Everyone will be impressed and it will be a million times easier to serve.

Here's what it looked like when I'd carved one breast for transport to a friend's house.


Notice that the breast meat is cut much thicker than what you're probably used to. That's the right way to do it. Note that this kind of cooking does not result in a smoky flavor. What it does result in is a juicy, delicious turkey that looks and tastes great.

Practice on a chicken (cooking time: about an hour) and be an expert by Christmas.

Online Shopping Tips
My sister likes to get up early on the Friday after Thanksgiving and get deals at the stores. I like to sleep in and do my shopping online. Here are a couple of tips that will save you money while letting you shop from home.
  • Visit www.dealnews.com. Set up an account and have them send you emails when items you want are on sale. I devoted an entire blog post to them and here is the link. Hint: sort the list of deals chronologically. That way, when you check the site a second time, you can quickly see what's new since your last visit.
  • Visit www.retailmenot.com before buying something online. RetailMeNot finds discount codes which you can use to save money on your online purchases. This should be part of your routine. Find the item you want to buy online, then make a new browser window (File menu) and go to retailmenot.com to see if there is a discount code for what you're about to buy. I wrote about this site a bit ago and here is the link to that.
  • Visit Amazon.com and see what's cooking with their Gold Box specials and also their Black Friday specials.
You'll probably save money with these tips and you'll definitely get more sleep. For some people, the thrill of the hunt makes getting up in the dark and driving to the mall worth it. If that's you, tell me about it sometime after 9 AM.

Keeping Track of the Football Games
You're probably thinking "turn on the TV, silly." Turns out that I don't have a TV, so I keep up with the games in other ways. First, there's the ESPN ScoreCenter app for the iPhone and for the iPad. This keeps you up to date on the scores of the games. Next, there's the Watch ESPN app, for the iPhone and for the iPad. This one actually lets you watch the games right on your iPhone or iPad, with some restrictions based on your internet provider. I also use the Watch ESPN website to watch games live, but also to watch games I've missed, on my Mac. It is very cool to be able to jump to the 4th quarter of a game, or to rewind a game in order to see a key play. Even Monday Night Football can be seen this way.

I also use Yahoo's Sportacular app on the iPhone and on the iPad. These apps do a great job of keeping up with scores and they also provide written play-by-play, so you can keep up with a game without really watching it. Very handy stuff. With several key games this weekend, college and pro, you need all the help you can get.

So there you have it: turkey, shopping, and football. If that's not Thanksgiving in a nutshell I don't know what is. Happy Thanksgiving to everyone and thanks for visiting the blog.

Wednesday, November 18, 2015

How to Use Safari's Reader

safari-reader-icon
Every so often I show my Mom something on her iPad (or her iPhone, or her Mac) and her reaction is incredibly enthusiastic. Actually, sometimes it's more along the lines of "I wish you'd shown me this before." Either way, when that happens, I write it up for everyone. This is one of those times.

Safari's Reader feature has been around for a bit but since Mom didn't know about it I'm assuming that there are at least a few others who don't know about it too. In a nutshell, it makes web pages easier to read by eliminating the ads and other distractions. It's available on the Mac, on the iPad, and on the iPhone. It makes a huge difference in readability, especially on the iPhone. You really ought to try it.

Here's an example of a web page on the iPhone, in the normal view:
IMG_1901

Here's the same page, after clicking the big grey "Reader" button at the top of the page:
IMG_1902

Which would you rather read? Of course you'd rather read the second one. It's a million times more readable. Note the buttons at the top for changing the font size and for sharing the page by email or printing or Twitter or whatever. There's also a "Done" button which takes you back to "normal."
IMG_1903
Interestingly, the Reader button is blue when using Safari on a Mac, while it's grey on the iPad and iPhone. Double-interesting: when Reader can't figure out which part of a web page is the "real" content, it disables itself… and on the Mac, it indicates "I can't do this in Reader" with a grey button while on the iPad and iPhone, the button simply doesn't show up. Just to confuse things more, when you're using Reader on the iPad, the button turns purple, and you tap it again to turn leave Reader and turn the button grey. Save us, Jony Ive.

Interface inconsistencies aside, Safari's Reader is a fabulous feature. You should try it.

BONUS: you've probably had to deal with stories on the web that are split into multiple pages, such as the one shown below (with the "next page" buttons highlighted). This screenshot is from an iPad.
IMG_0491

Sites that cut their stories into pieces that way do it because it gives then another chance to display ads, which means money for the site. It also means it's more difficult for you to read because you have to read-click-read-click-read. Safari's Reader feature takes care of sites like that by "reading ahead" so that page 2 follows page 1 without a click.

Here's how it looks in Reader:
with_reader

Did I mention you should try it?

Monday, November 9, 2015

How to Use Safari's iCloud Tabs

safari_iCloud
(No, that's not the official iCloud logo, but I thought it would be fun to build one from Safari icons.)

How to Use Safari's iCloud Tabs

Safari's iCloud Tabs is a feature I didn't think I'd be interested in, and now I use it all the time. Give it a try and see if you're not hooked, same as me.

iCloud Tabs keeps track of every Safari window (and every Safari tab) on all of your Apple devices, including Macs, iPhones, iPads, and iPods. Then, it makes the combined list available from each device. What this means is you can start reading a website on your iPhone and have it automatically waiting for your on your Mac so you can finish reading it there.

Before we go any further I have to tell you that this only works with Macs on Mountain Lion (10.8) or higher, and iPhones/iPads/iPods on iOS 6.0 or higher. OS X 10.7 won't do and neither will iOS 5. And, you have to have an iCloud account, but that's free so it's not much of a hurdle.

Let's see how it works.

Here's a screenshot of a fresh-from-the-box Mac Safari window. Notice the toolbar buttons (circled in red). All we have is the back button, the forward button, and the Share button.
freshfromtheboxsafari70

(If, in addition to the back, forward, and Share buttons you also see an iCloud button it means your Mac is already set up to sync Safari via iCloud. If not, go to System Preferences, click the iCloud button, and check the box next to Safari. This will lead to a box asking you whether you want to merge bookmarks across your devices. You probably do, so click Merge and move along.)

When your iCloud settings include a checked box next to Safari your Safari toolbar will look like this:

icloudbutton70

The middle button is the iCloud Tabs button, and it shows up automatically.

Click the iCloud Tabs button and you'll see something like this: a bold grey heading for each of your iCloud Tabs-enabled devices (except for the one that you're currently using) and under each heading the Safari web pages that are open on that device.

icloudtabsmenu

You can select an item from the list and load up that web page on whichever device you're using. For example, in the picture above we see that I was looking at a web page called Simran Design | portfolio on my iPhone 5. If I want to see that page on my iMac (the machine I'm currently using) I can select it in the iCloud Tabs list and load it right up. See below.
simrandesign
(In this real-life case, I was browsing the Simran Design site on my iPhone and became distracted-- then, hours later, I was on my iMac, clicked the iCloud Tabs button in Safari, and I could easily go right back to where I'd been earlier. All without having to "do" anything other than ONE TIME going to the iCloud preference pane to be sure the Safari box was checked.)


Here's how it looked on the iPhone.
simraniphone320

Actually, there's one more thing you have to do, and that's "set it up on your iPhone too." That's easy:
Tap Settings, then iCloud, then be sure the switch for Safari is "on."

If you want to work it in the other direction (that is, you want to use your iPhone to see web pages that are open on your other devices, such as your Mac), just tap the Bookmarks button (looks like a book), then tap the left-pointing arrow at the top of the iPhone's screen until you see something like this:

iPhoneicloudtabs320

Tap the iCloud Tabs button and you'll see the list of open web pages:

iPhoneicloudtabslist

Tap any item in the list and you'll load it in Safari on the iPhone.

Pretty cool stuff.

A few things you need to know about iCloud Tabs:
1. You can't do iCloud Tabs without merging bookmarks. This is probably not an issue for anyone.
2. This doesn't work with Google Chrome, and it doesn't work with Firefox. Sorry.
3. Obviously (I think), you have to be signed into the same iCloud account on all of your devices.
4. Remember: Mountain Lion (or higher) on your Macs, and iOS 6 (or higher) on your iPhones, iPad, and iPods.

UPDATED September 5th, 2014: Boyce Blog reader Antonio informs me (from Mexico!) that turning on Private Browsing in Safari will keep that device's windows from showing up in Safari on your other devices. So, if you can't seem to get iCloud Tabs to work, take Antonio's advice and check to be sure that you're not running Private Browsing. I should add that none of this works without you turning on the Safari option in System Preferences/iCloud on the Mac, and Settings/iCloud on your iOS devices. I should have mentioned that to begin with. Thanks, Antonio, for making me go back and make this blog post better. Now please join the mailing list so you can help me out in the future!

iCloud Tabs is a great example of the kind of service that iCloud provides. It's not something you interact with directly-- rather, it's something that allows you to get to "your stuff" no matter which device you're using, in a completely transparent manner. It's about as close to magic as it gets. You should give it a try.

Written by

Support The Boyce Blog by starting your Amazon shopping here.
Shortcut to Amazon's Mac page-- desktops, laptops, software, accessories.

Thursday, November 5, 2015

Get at least $200 for any working iPad at Target

Target_logo

Get at least $200 for any working iPad at Target

Target is offering at least a $200 gift card for ANY working iPad (newer iPads get more). The iPad can't have any scratches on the screen, and it has to turn on. Do what you want with the gift card (though I recommend spending it on either the iPad Air or the iPad mini, or possibly on Christmas gifts for your favorite blogger).

You'd better move on this quickly.
The offer is good through November 9th, 2013. Target's regular trade-in offer for the original iPad is $65 so if you have one of those this $200 deal is really something. Plus, as of this writing, Target is offering gift cards when you buy an iPad from them. Wow.

Here is the link to
Target's web page describing the program.

And here is the link to
Target's gift-card-with-iPad-purchase program.

Use the Share button and tell a friend!


Saturday, October 31, 2015

iOS 7: Get the iOS 7.0.3 Update

heresatip_ios7

Get the iOS 7.0.3 Update

If you're still using iOS 6 that's fine-- stay there if you want. But if you're on any version of 7 lower than 7.0.3, get your device updated to 7.0.3 pronto. There are lots of improvements in iOS 7.0.3, but here are the most important ones:

1. iOS 7.0.3 introduces the iCloud Keychain feature that remembers your log-ins for websites and your passwords for WiFi networks. Enter the info once and it's remembered, so you don't have to enter it ever again-- and it syncs across all of your iOS devices (as long as they are on 7.0.3 or higher). Imagine how nice it will be to enter log-in info, or WiFi passwords, on your iPhone-- and have it show up on your iPad! For the person who has an iPad and an iPhone the iCloud Keychain feature is a dream come true. Even with a single iOS device it's a very useful and handy feature.

2. iOS 7.0.3 brings back the "search the web" option for Home screen searches, same as in iOS 6. (Rick, I think they did this one for you.)

3. iOS 7.0.3 fixes a bug that made activating iMessages impossible.

Apple is a little bit quiet about the bugs that they've fixed with 7.0.3 but I would guess that some of the bugs were revealed

You can read
Apple's iOS 7.0.3 release notes and find out more.

Get the update by connecting your device to a charger and then going to the Settings app, then General, then Software Updates. Never roll the dice by installing a software update on battery power. Never ever.

Rick S. wins the Coffee Cup for inspiring this blog post. Congratulations, Rick.
cba_coffee_cup

Friday, October 30, 2015

How to Find an iPhone 5s

UPDATE (NOVEMBER 5TH, 2013): Apple's legal department has asked that the Apple-Tracker website be shut down as it violates terms of use of the Apple.com website. So now it's gone. Too bad-- it was rather handy. Thanks, Apple-Tracker.

apple-tracker

How to Find an iPhone 5s

Looking for an iPhone 5s?

Of course you are.

And are you discovering that the
iPhone 5s is in short supply?

Of course you are.

And are you wishing there was a way to check the inventory of every Apple Store near you, with a minimum of effort?

Of course you are. So am I. Fortunately, there's a website called
Apple-Tracker.com which makes searching for an iPhone 5s a quick and easy operation. Go to the site, tell them which model you want, enter your zip code, and let them search every Apple Store near you. With one click you'll get something like this:

apple-tracker-example

You can check back every so often, or you can sign up to be emailed when the
iPhone 5s you want is available.

Apple-Tracker.com does its magic by consolidating searches that you could do one at a time (but why would you-- Apple-Tracker.com is so much easier). The information is public and it's up to the minute and it's presented quickly and simply. Hard to figure out how it could be better.

UPDATE: they made it better. Apple-Tracker.com can help you look for the iPad Air and the iPad mini Retina display too. You can't buy either device until Friday November 1st, 2013, but with apple-tracker.com you'll be ready. See below.
apple-tracker-device-choice

You can also find the
iPhone 5s at Radio Shack, and at Best Buy, and at AT&T, and at Verizon, and at Sprint, and at T-Mobile, among other places, but by far the easiest way to find one is with Apple-Tracker.com. Check it out.

Joyce K. wins the Coffee Cup for inspiring this blog post. Congratulations, Joyce.
cba_coffee_cup

Thursday, October 22, 2015

iOS 7: Reset Your iPhone (or iPad) and Fix Mysterious Problems

heresatip_ios7

Reset Your iPhone (or iPad) and Fix Mysterious Problems

I'm getting a lot of calls about things that don't work right after the iOS 7 upgrade. Two of the oddest: the camera wouldn't take pictures, and email could not be sent even though the settings appeared to be correct. When faced with this kind of issue you have two great chances to make things right again.

Your first chance is to simply turn the iPhone (or iPad) off-- completely off-- and then back on again. You'd be surprised at how many problems go away with the old off-on routine.

(In case you've forgotten how to turn your iPhone or iPad off, here's what to do: press the Power button-- Apple calls it the "Sleep/Wake" button but that's not a very good name-- at the top right edge of your device, and keep it pressed until you see a message about swiping to turn off. Do that, and wait a bit, and your device will turn completely off. This is what you're supposed to do during takeoff and landing on commercial flights. Putting the phone to sleep, or into "airplane mode," or turning it face-down so the flight attendant can't see the screen is not the same as turning it off, and yes I am talking to you over there in Seat 24C.)

Your second chance to fix things is to do a reset. Try this when turning your iPhone/iPad off and back on again doesn't solve the problem, or when the iPhone/iPad simply won't turn off for some reason. A reset is a two-handed job: press and hold the Power button, and at the same time press and hold the Home button (the one in the middle of the bottom of the iPhone/iPad bezel). Keep those two buttons pressed until you see an Apple logo. Let go, and let your device start up. It might take a little longer than normal so be patient. With a little luck everything will be back to normal, and no you will not lose any data. Your pictures will still be there, your settings will still be there, your contacts will still be there, etc. In fact, everything will be just as it was before you did the reset-- except that everything will work properly. At least most everything, and at least most of the time.
Next time your iPhone or iPad isn't behaving properly just turn it off and then back on and see how it goes. If that doesn't work, try the Power-Home reset. Odds are your problems will disappear.
Note: there is another kind of reset, performed in the General section of the Settings app. That's not what we're interested in here. Use the reset-from-the-Settings-app method when you're looking to completely wipe your old device out so you can give it to your friend/kid/dog.

Veronika K. wins the Coffee Cup for inspiring this blog post. Congratulations, Veronika.
cba_coffee_cup

Wednesday, October 21, 2015

Use Google to Search One Website


Right when you think you know everything, you learn something new. At least that's what happens to me. Yesterday, I learned how to restrict my Google searches to a particular site. This can be very handy when you know that you read something on the internet, and you are sure you know the name of the site, but you just can't find the article. The technique is also handy if you are wondering whether a particular website has covered a particular topic.

For example: let's say you're looking for an alternative to Quicken, because you're moving up to OS X Lion and you know that Quicken 2007 is not compatible with Lion. Let's say you hear somewhere that the website www.maclife.com did an article on the topic. You set out to look for it, using Google.

Here's what you get when you search for "alternatives to quicken maclife" using Google. It's not bad, but there is a lot of stuff here that isn't on www.maclife.com.

So now you try searching for "alternatives to quicken maclife.com" and while the results are better, they aren't restricted to articles on www.maclife.com. And maclife.com articles are all you're looking for this time.

Turns out there's a way to do what you want. What you do is put "site:" in front of the site you want to search.

Like this: alternatives to quicken site:maclife.com. You can put in www if you want. But you don't have to.

Works like a charm. Try it.

Friday, October 16, 2015

How to Edit Photos Using iOS 8's Photos App

How to Edit Photos Using iOS 8's Photos App

Listen to this blog post!
Ios8 photos app icon

Apple's packed some great photo-editing features into iOS 8's Photos app. It's not quite Photoshop but it may be all you need. Plus, it's already on your iPhone, assuming you're on iOS 8. Plus it's a ton of fun.

Here's how you can use these features to quickly improve your pictures.

Mom, and others on iOS 7: use Snapseed. Sorry about that.

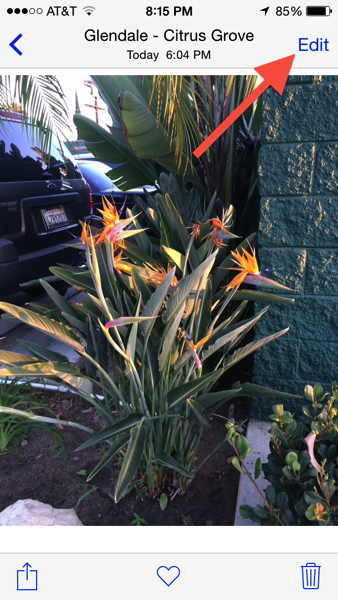
Start by taking a picture, or choose one from your Photo library, and tap "Edit" at top right. If all you see is a picture, tap the picture itself and you'll see buttons appear at top and bottom. You want the one at the top right.

Here's a nice picture of a Bird of Paradise plant. It looked better when I took it. I'm going to fix it up.
Starting to Edit

After you tap Edit you'll see something like this. Actually, exactly like this. Except your picture won't look like mine.

iOS 8 photos magic want tool

The first thing to try is the Magic Wand, in the top right corner. All you do is tap it and like magic your picture gets better. Tap it again to turn it off in case you don't like the results. You can see that it's fixed up my picture a little bit. I don't know all of what it does but that's why they call it magic.

iOS 8 after using Magic Wand

I'm going to turn the Magic Wand's effect off, because while it fixed things up a little bit it didn't fix it up enough.

Let's look at the options across the bottom of the screen: Cropping, Filters, and Adjustments.

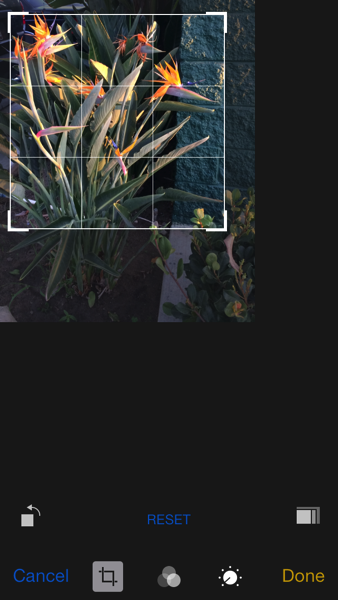
Cropping works as you might expect: tap the Crop tool and drag things around until the picture is nicely cropped.

Note you can rotate the picture as well, either freehand (by dragging with your finger) or in 90-degree steps using the square-with-curvy arrow button at bottom left in this picture.

I'm going to crop out the car in the background, at least part-way. You can also tap inside the frame and drag your picture around, as I have here. The iPhone will wait a second or two for you to stop moving things, and then it will crop and zoom in on the part of the photo you've kept.

Here's how it looked while I was working on it...
iOS 8 in crop mode

And here's how it looked a few seconds later, when the cropped section zoomed to fill the screen.
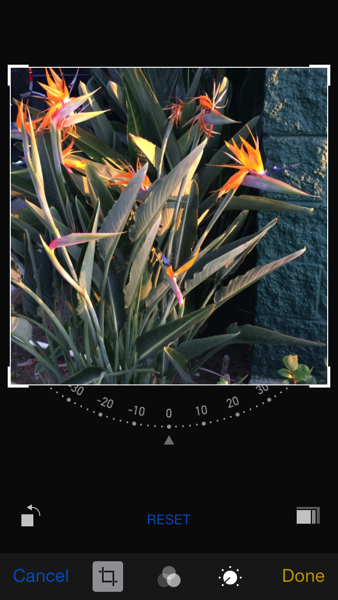
iOS 8 photos after cropping

The picture is better already.

By The Way: if you want to crop to a particular aspect ratio-- maybe a square, or 16:9-- tap the white button above the "Done" button at lower right in my picture. That will give you all of the standard aspect ratios you'd ever want. I, of course, wanted to do it "my way" so I did not use that button (although I did come pretty close to making a square).

You might be tempted to tap "Done" at this point but that would not be the right move here. If you do that you'll save the picture, which is fine, but we have more editing to do.

You might also be tempted to use the Filters (the middle button across the bottom). I wasn't. But, since all you do in the Filters section is look at a bunch of thumbnail variations and pick the one you want, you don't need my help with that.

Let's get to the good stuff. It's all under the Adjustments button. Tap it and you'll get something like this:
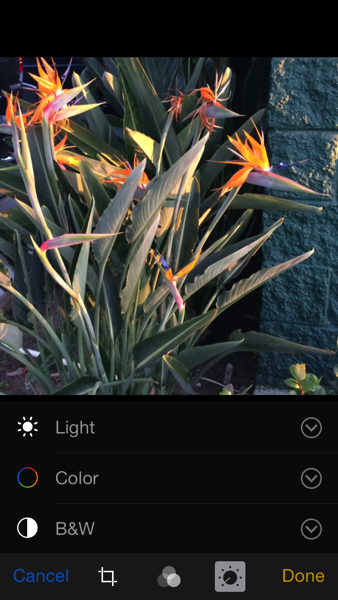
iOS 8 Photos app Adjustments

You can do a lot here-- I'm going to start in the middle, with color, because I want to punch things up by over-saturating the picture.

If you tap on "Color" (or anywhere in that row that isn't the down-arrow at the far right) you get this:

iOS 8 Photos app Color adjustments

You can drag back and forth until you get a picture that you like, and there's nothing wrong with that. But it's a little coarse and rather limited. The better way to go is to tap the down-arrow to begin with (or, if you accidentally got into the coarse-and-limited area, tap the icon I'm pointing to with the red arrow).

This is what you're looking for: options galore.
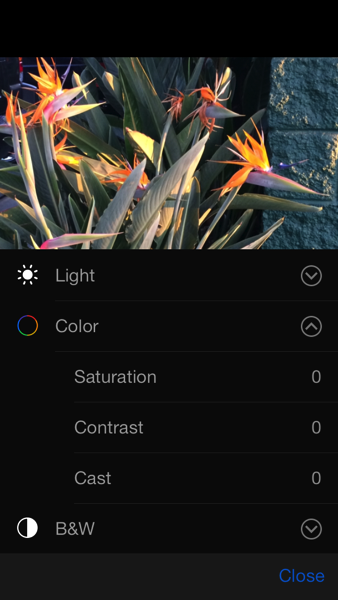
iOS 8 Photos app Color options

I want to adjust "Saturation" so I give that a tap, leading to this:

iOS 8 Photos app Saturation

This is typical of the way you make adjustments: you get a slider, and you drag it around until you're happy. It took dragging all the way to the right before I was happy and here's how it looked:
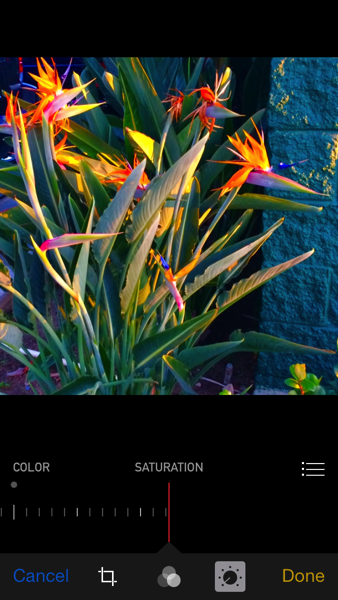
iOS 8 photos app full saturation

No wonder I was happy. What a great picture, all of a sudden. However, after mulling it over I decided to back off just a little. It's still great, just a little less loud about it.
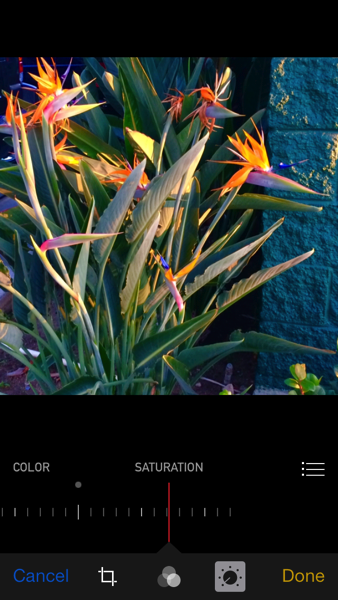
iOS 8 Photos app almost full saturation

Now we're getting somewhere. Contrast is controlled the same way that Saturation is-- with a slider. You get to Contrast by tapping the icon that looks like this:

iOS 8 Photos app options

Because it's so easy, and because this picture doesn't need any help in the Contrast department, I'm skipping it. But I will show you "Cast."

This is really "Color Cast" and it controls whether your picture is "warm" or "cool." Here's full-blast "warm:"

iOS photos app color cast(picture with full-blast warm color cast)

... and here's full-blast "cool."
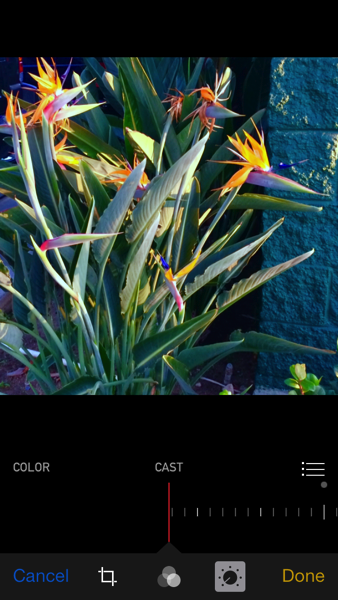
iOS 8 photos app cool color cast

I like it almost full-blast warm, as it reminds me that the sun was going down and everything had a nice warmth to it.
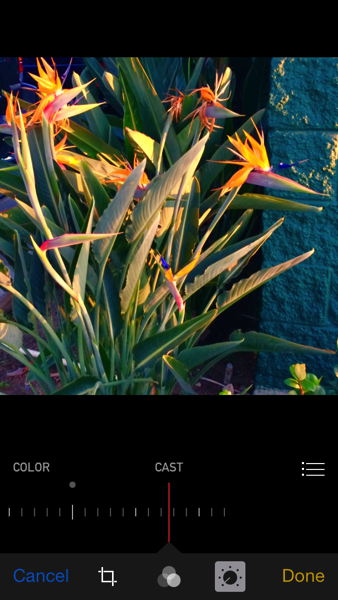
iOS 8 photos app color cast

Down below's a little movie showing you how I got to this stage. (You probably have to tap the movie to start it.)

ios8photosappmovie1

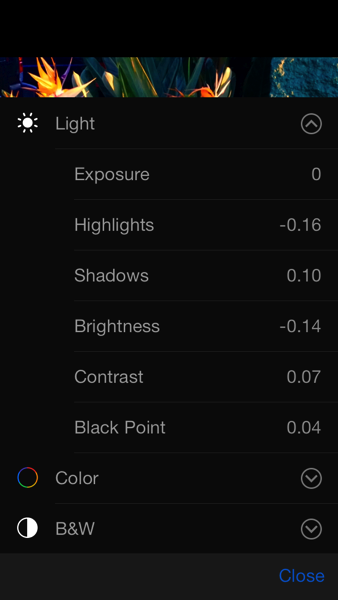
Now let's see what we can do using the controls under "Light." Remember, if you tap where it says "Light" you get the slider with the thumbnails. (Also remember: tap that button with the three dots and the three lines to get to where you can choose the Light section). If you want finer control tap the down-arrow.

Here's what the basics looks like...
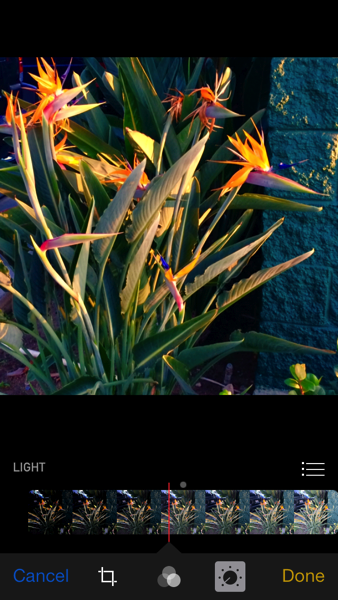
iOS 8 photos app Light

and here are the finer controls.

iOS 8 photos app Light finer controls

I'm going to darken up the shadows a little because I want the plant to really "pop."
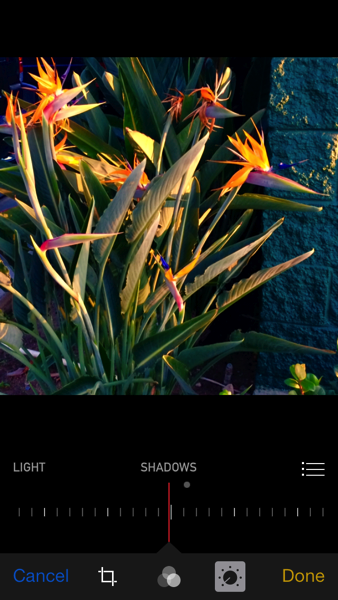
iOS 8 photos app shadows adjustment

One more thing I want to adjust is the so-called "Black Point." What you're doing with Black Point adjustments is saying "See this shade of gray? Everything that's darker than that, make it pure black." With the Photos app you don't actually get to point to the shade of gray you're talking about. Instead, you use (what else?) a slider.

Here's how it looked after a little Black Point adjusting.

iOS 8 photos app black point adjustment

I'm going to skip the Black and White section because I'm pretty sure, after having seen how Light and Color work, that you don't need me to show you. Besides, I want a color picture, not a black and white one.

BONUS TIP THAT I DISCOVERED WHILE WRITING THIS BLOG POST:

Suppose your screen looks like this:
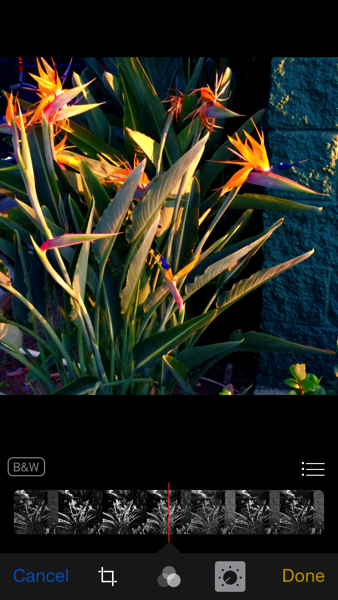
iOS 8 photos app black and white

Swipe down on the main photo-- you see the color thumbnails! Drag some more and you see the Light adjustments, and eventually the Light thumbnails. That's a nice way to switch between things, isn't it? You can drag on the thumbnails too but it is hard to drag exactly straight up and down when you get into the adjustments sections. Try it and see.

Here are the Color thumbnails...
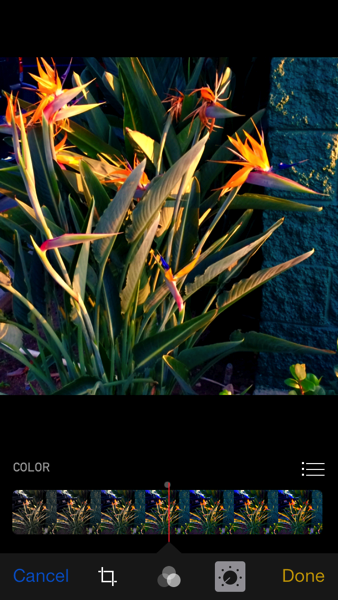
iOS 8 photos app color

and here are the Light thumbnails, both accessed by swiping up and down on the main picture.
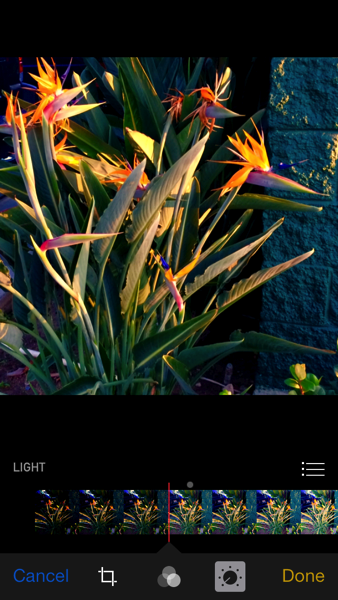
iOS 8 photos app Light

Watch the movie below and see. (You probably have to tap the movie to start it.)

ios8photosappmovie2

Now suppose you make a mistake and accidentally change your picture to black and white. Can you get out of that? (Of course you can-- this is a set-up.)
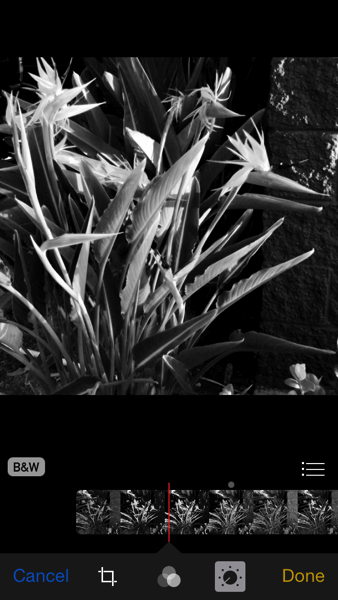
iOS 8 photos app black and white oopsy

Naturally you could tap "Cancel" but that cancels EVERYTHING. You don't want to start over. But notice the B&W is now black writing on white-- before we made our mistake, it was the other way around. Tap it, and it reverts. What a relief! See below, and notice how the "B&W" label changes. .
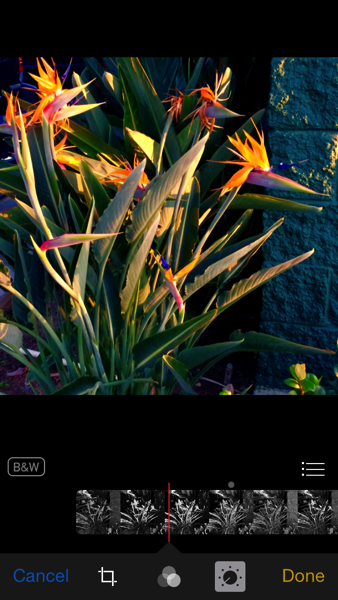
iOS 8 photos app black and white undone

Once we're satisfied with things we tap "Done" and the picture is saved. Here's our final product. Compared to the original, there's no comparison. The adjusted version is a LOT better. Maybe I should have stopped after the Saturation step, come to think of it. But it's still better.

Final Product (below)

Finalproductcropped

Original Photo (below)

Original

Turns out there's more to learn but this is enough for today. If you're wondering about the button we didn't tap-- the one opposite the Magic Wand-- that's the button that allows you to access other photo-editing apps, without leaving the Photos app itself! That's pretty neat, but it's also very new, and not too many programs make themselves available to the Photos app that way. If you have some photo-editing apps on your iPhone or iPad you ought to give that button a tap.