Wednesday, September 30, 2015

iOS 8 Tip #8: Make and Answer Phone Calls From Your iPad

Eight for 8: An iOS 8 Tip a Day, 8 Days in a Row (Day Eight)

Listen to this blog post!
Eight for 8 logo day 8 eight ball

Eight for 8, Day Eight.

I make a point of turning off my iPhone's ringer when I am in someone else's office or home. Occasionally I forget to do it, and when a call comes in I rush to slide the switch to "mute." That's what happened last week, but when I muted the phone, the ringing didn't stop!

Turns out that the ringing was coming from my iPad. My iPad! The one without any cellular service (aka "the cheap one"). The one that doesn't do anything internet-y without WiFi. The one that most definitely is NOT A PHONE. All of a sudden, without any warning, my iPad thinks it's a phone.

It took me by surprise but once I figured out how it worked, I liked it.

iOS 8 Tip #8: Make and Answer Phone Calls From Your iPad

So how does it work, anyway?

Well, it works like this. If your iPhone and iPad are both on iOS 8, and they both are on the same WiFi network, and they both are signed into the same iCloud account, and they both have "iPhone Cellular Calls" turned on in the Settings, then your iPad is going to ring when someone calls your iPhone. You can answer the call on your iPad and tap the Speaker Phone button and have a little chat, all from your iPad, while your iPhone sits in the charger in another room, or maybe in your purse.

Here's what it looked like on my iPad when my mom called tonight. Repeating: on my iPad. Let that sink in for a minute.

Phone call from Mom, on the iPad

You can also initiate a call from your iPad. The calling is actually done by your iPhone, but from the point of view of the person holding and talking to the iPad, it feels like the iPad does the work. The first time you do this you'll shake your head in wonder. Now you can while away the evening playing "Words with Friends" on your iPad and when a call comes in, you just answer the call right there. I'm telling you, it's absolutely nuts.

I did some experiments here and was able to make and receive calls on my old iPhone 4s (upgraded to iOS 8), even though it no longer has service. It meets the requirements I wrote above-- iOS 8, same WiFi as the (activated) iPhone, signed into the same iCloud account as the (activated) iPhone, iPhone Cellular Calls turned on-- and by golly it's making phone calls again. I am not sure how I am going to put this to use but if I do something cool with it of course I will write it up (and if you're on the mailing list you will be among the first to know about it).

Here's a screenshot from my old iPhone 4s, the one that's been sitting around since being replaced by the 5s. It shows a call coming in.

Phone call on the inactive 4s

Here's what the Settings need to look like-- on your iPhone, and on your iPad-- if you want this to work. (If you turn off FaceTime the iPhone Cellular Calls option goes away.) These are FaceTime settings, so go to Settings/FaceTime on your iPhone and on your iPad and turn those things on, if they aren't on already.

<IMG 0042

When a call comes in, and you answer it on your iPad (or on your old no-service iPhone, or even on a newer iPod Touch), your "real" iPhone will show the green bar across the top, as it does whenever you're making a call. That's showing you that the phone is actually "in use." If you tap that green bar, the call will be transferred smooth as you please to your iPhone, and the iPad will simply let go. (There does not appear to be a way to pass a phone call from your iPhone to your iPad. You can answer the call on the iPad and pick it up later on the iPhone but not the other way around. FYI.)

If this all sounds vaguely familiar it's probably because Apple showed a similar feature for the Mac in June when it demonstrated the upcoming "Yosemite" Mac OS at the World Wide Developers Conference. With Yosemite, you can look up a phone number in your Mac's address book, or click a phone number in an email on your Mac, and your iPhone will make the call... but the sound comes out of the Mac, it uses your Mac's microphone, and you never touch the iPhone. That's exactly what we've got going with our iPad, assuming they're on iOS 8.

And THAT, my friends, is iOS 8 Tip #8: An iOS 8 Tip a Day, 8 Days in a Row. Please consider signing up for our mailing list, and note the links below to the rest of the tips in the series.

Links:

Great Deals on New and Closeout Macs


MacMall is having a 72-hour sale on Macs (MacBook Pros, MacBook Airs, iMacs). Check it out and save a pile of money. Contact me if you need help with choosing a model.

If you're choosing one for ME, I like the 21.5 inch iMac with the 3.6 GHz Core i5 for $1099.

Tuesday, September 29, 2015

iOS 8 Tip #7: Set the Camera's Focus and Exposure Independently

Eight for 8: An iOS 8 Tip a Day, 8 Days in a Row (Day Seven)

Listen to this blog post!

Eight for 8 logo day 7

Eight for 8, Day Seven. Feeling lucky.

Some of iOS 8's new features are more like refinements of old features, and some of them are a little on the subtle side. In fact, some of them are so subtle you might not notice them-- but that's why I'm here, to point them out for you. Here's one now.

iOS 8 Tip #7: Set the Camera's Focus and Exposure Independently

Until iOS 8, the standard Apple Camera app set focus and exposure wherever you tapped on the screen. That was actually pretty powerful and many a potentially-bad photo turned out downright decently thanks to a well-placed tap. The only problem was, in some cases the thing you wanted to focus on wasn't the thing you wanted to expose for. So you compromised, but you didn't think of it like that because it was a miracle that you could set the focus and exposure at all, and besides, the pictures almost always turned out great.

However, as it is with other things, as soon as you find out how to set focus and exposure independently, as you can in iOS 8, you realize how deprived and unhappy you've been up to this point. You didn't know what you were missing (because it wasn't invented yet) but you will in a minute.

Let's have an example.

Suppose you have a bunch of junk on your desk, and a small stuffed duck, and you want to take a picture of the duck.

Original Duck picture

The duck isn't really in focus so I tap on it, and I get the second picture:

Duck in focus, bad exposure

That's better, focus-wise but the exposure's not right. It's just too dark. (Memo to those who might want to take pictures of a small stuffed duck: do it during the day, when the light is better. Also, clean off your desk first.)

The next picture shows an in-focus duck, and the exposure is much more to my liking. That's because I took advantage of iOS 8's ability to let me set focus and exposure independently.

Duck in focus, slider gone up

Here's how it works.

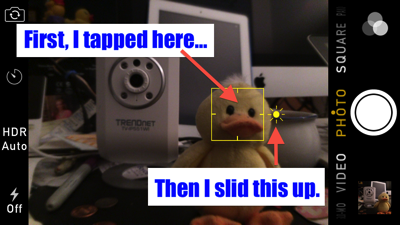
Get the camera app going and compose your picture. Tap where you want the camera to focus, same as you've done in iOS 7 and earlier. Then, notice the little sun icon to the right of where you tapped. You can drag that sun up and down to change the exposure. Do that until you're satisfied, then take the picture.

It sound simple because it IS simple. And it makes your pictures better than ever. Try it while you're thinking of it-- you'll be an expert in no time.

How I did it

(Note: I had to enhance the screenshot to make the yellow box around the duck, and also the little sun/exposure icon, easier for you to see. They won't be quite as bright in real life.)

Apple put a bunch of other features into the Camera app, including a self-timer, a time-lapse mode, and a faster burst mode. You should poke around and experiment with these features so you'll know how to use them when the need arises. Sometimes you get but one chance to take the picture; do some practicing ahead of time so you'll be ready.

And that, ladies and gentlemen, is iOS 8 Tip #7.

Links:

Buying an iMac? Wait a week

All signs point to a revised/renewed/refreshed iMac coming very very soon. If you can wait, wait.

Monday, September 28, 2015

iOS 8 Tip #6: See the Battery Usage, per App

Eight for 8: An iOS 8 Tip a Day, 8 Days in a Row (Day Six)

Listen to this blog post!

Eight for 8 logo day 6 dice

Eight for 8, Day Six. Let's get rolling.

I get a lot of calls asking how to prolong the battery life on iPhones and iPads, so many that I've written a couple of blog posts about that already: here, and also here. But iOS 8 gives us a new tool in our quest for longer battery life, and that is the subject of today's iOS 8 tip.

iOS 8 Tip #6: See the Battery Usage, per App

If we knew which apps were eating up our batteries we'd be more careful about turning them off, or getting rid of them altogether. Now, with iOS 8, we can figure it out, because in the Settings there's a new "Battery Usage by App" option that shows you what's using up the juice. Just go to Settings, General, Usage, Battery Usage and wait for the percentages to be calculated.

Note: you could, if you wanted to, just kill every app but that is rather brute-force-ish. Using the Battery Usage screen lets us be almost surgical. it's a much better way to manage things.

Here's a picture showing the battery usage, by app, for my iPhone 5s.

Battery Usage for iPhone 5s

There's nothing in this list that looks bad to me, as these are apps I've been actively using. It's reasonable that they're the ones that have been using up the power.

The apps that are going to steal power behind your back are the ones that do "Background App Refresh" or that use the Location Manager (such as apps that help you find coffee or gas stations or ATMs near your current location). Obviously, some apps HAVE to work in the background and some apps HAVE to use your location (and some apps have to do both: if you're using an app for navigation, the app has to keep working even if it's not the frontmost app, and it has to continually get your location so it can tell you when to turn). But a lot of apps simply want to work in the background, and in many cases the benefits are not as great as the costs. For example, I can't see a big benefit in having the Stocks app, or the Weather app, refreshing themselves in the background. I can wait a second for them to update when I launch them if it's going to save the battery.

It boils down to this: if your iPhone's battery is draining too quickly, go to Settings, General, Usage, Battery Usage and see if you can find a smoking gun. Maybe there's a forgotten app sucking down the power. Maybe you have an app doing Background App Refresh when you really don't need it. Whatever, iOS 8's Battery Usage by App screen gives you information you didn't have in previous versions of iOS. (Click here for information on turning off Background App Refresh on an app-by-app basis.)

"Knowledge is power"-- but when it comes to the iPhone, knowledge is power savings. Don't overlook this important new feature.

And that's iOS 8 Tip #6.

Links:

Automatically Open Multiple Websites, Part 2: your own AppleScript


Last time, we saw how we could open multiple websites with a single click. Problem is, the websites that we opened with one click were the ones I chose. So, now we're going to learn how to specify which websites get opened.

We're going to write an AppleScript, and we're going to use Script Editor to do it. You can find Script Editor in your Utilities folder, which is in your Applications folder. Bonus shortcut hint: click on the Finder in the Dock (or the Desktop, or some other Finder window so as to bring the Finder to the front). Click on the Go menu and slide down to "Utilities." Presto.

Find the Script Editor in the Utilities folder and double-click it. You'll get a blank window. Copy the text below and paste it into the blank Script Editor window.

set the_URL_list to {"http://www.apple.com", "http://www.ioperating.com", "http://macrumors.com"}

repeat with a_URL in the_URL_list
open location a_URL
end repeat

The result will look a lot like this:

Click the Compile button and it will look like this.

(Compiling checks for mistakes and prettifies the script. Your script could look different than this but don't worry about that-- unless you get an error. In that case, go back and be sure you copied and pasted the right stuff.)

Just for fun, click the "Run" button. You'll see three web page load: www.apple.com, www.ioperating.com, and www.macrumors.com.

Assuming that the script works and that you got three web pages when you clicked "Run," it's time to customize it to open YOUR websites. You can probably tell that the place to do it is right at the top. Go in there and do it! Just remember these rules:
  1. Each website must be surrounded by double-quotes.
  2. Separate the double-quoted websites with commas.
  3. No returns please. Let the Script Editor wrap the text for you.
There is no limit to the number of sites you can enter. Try a couple, and then click Compile, and if you don't get an error, click Run. Add the rest of the websites that you want to open, and Compile, and then Run. If it works, you're ready to save it. Here you have to be just a little careful, because there are various ways to save your script, and only one of them is the right one for our purposes.

What we want is to wrap this script up in a double-clickable application that does its thing automatically. So, when you go to Save As..., change the File Format to Application. Name your script anything you'd like, and put it somewhere that you can find it. For now, let's put it on the Desktop. Now you can quit the Script Editor, because we're done with it.

Look for the script you just saved. Here's what it will look like:

(Yours might have a different name. That's OK. But the icon should be like this one.

Technically, you're done. When you double-click the script it will launch your preferred browser and load up your web pages. That's two clicks, and that's not much work. But, we can cut that work in half by putting the script into the Dock. So do that. Remember that putting something into the Dock doesn't mean you can throw away the original. Put the original-- your script-- somewhere safe and that's that.

Sunday, September 27, 2015

iOS 8 Tip #5: Hands-Free Siri

Eight for 8: An iOS 8 Tip a Day, 8 Days in a Row (Day Five)

Listen to this blog post!

Eight for 8 logo day 5 228

Eight for 8, Day Five.

iOS 8 gives us a new, hands-free way of controlling Siri. Here's how it works.

iOS 8 Tip #5: Hands-Free Siri

Used to be, to use Siri you held the Home button down until you heard "beep beep," and then you let go and then you started talking, and when you stopped talking, Siri stopped listening. That worked pretty well except you had to keep talking-- if you paused, Siri thought you were done, and the results weren't always good.

Then Apple changed Siri so she'd listen as long as you kept the Home button down. You still had to press and hold the Home button and wait for the "beep beep" but at least your questions didn't get cut off.

In iOS 8, Apple's given us a Siri that listens all the time. You don't have to press the Home button at all! You simply say "Hey Siri" and then whatever it is you want to say. You can wait for the "beep beep" or not. See below for an example of "not."

Asking Siri how the Bears did in football today

... and here's Siri's answer:

Cal won in double overtime

Sorry to say, there's a little bitty catch. The catch is, the iPhone or iPad has to be charging or "Hey Siri" won't work. That sort of limits things but it's still handy. I have my iPhone charging on the table next to my FitDesk bicycle-desk, and while I'm typing (and riding) away I can say "Hey Siri, when does UCLA play Cal in football?" and get my answer, without reaching for the phone. Pretty neat. (According to Siri the game is October 18th, 2014 but the time has not been set.)

In my experience "Hey Siri" works really well if you're within six feet of the iPhone, which means it's perfect for in the car. Just plug your iPhone into a charger and set it on the seat next to you. With that kind of a set-up you can use Siri hands-free while you drive, the way you should.

One other thing: for some reason, "Hey Siri" is turned OFF by default. You have to turn it on, but that's easy: just go to Settings/General/Siri and you'll find it.

Hey Siri switched on

That's all there is to it. Give it a whirl.

Like a lot of iOS 8 things, "Hey Siri" is something you have to remind yourself to do at first, but eventually you'll use it all the time. Just remember that it only works when the iPhone's plugged in.

And that's iOS 8 Tip #5.

Links:

Saturday, September 26, 2015

iOS 7: How to Turn Off an Unused App

heresatip_ios7

iOS 7: How to Turn Off an Unused App

I am getting this question a lot lately, and understandably so: the way we turned off unused apps in iOS 6 (and further back) was a little different, and you can't do it that way in iOS 7. For review, here's how it worked in iOS 6:
  1. Double-tap Home button. The current app slid up, and every other app that you hadn't explicitly turned off was shown in a scrolling list across the bottom.
  2. Put your finger on any app's icon until it wiggles. The icons all get a red circle with a minus sign at their top left corners.
  3. Tap the minus sign to quit an app.
  4. Press the Home button to stop the wiggling.
  5. Press the Home button again to get the current app to slide back down.
It looked like this. You can sort of see the wiggling icons.
oldway_1

The old way of turning off an app was a bit of work, and if you never learned how to do it-- or forgot after you learned-- I'm not surprised. It was a little awkward. (Worst of all, the current app's icon was not in the set of icons across the bottom, so you couldn't quit the current app using this method. To quit the current app, you had to first get out of it, which required a Step "0" where you'd press the Home button to get to the Home screen, and then set into Steps 1-5 above. Six steps. Ugh. Try explaining this over the phone.)

iOS 7's new way saves steps, and you don't have to do anything special to deal with the current app. Here's how it works:
  1. Double-tap the Home button. The current app shrinks and moves left, and the rest of the running apps show up as icons (across the bottom) and as little iPhone/iPad screens (in the middle of the screen).
  2. Flick an app's screen (not its icon) upward and it flies right off the screen. That's it, you've done it. That app's not running any more!
  3. Press the Home button to return to the app you were using before you double-tapped the Home button to begin with.

Three steps instead of six steps. This isn't just different-- it's better.

Here's how it looks (the arrow won't be there-- I put it there to show you what to do):
turnoff_1_with_arrow

Here's how it looks as the app is moved toward the top. Remember, you're dragging the little screen that represents the app. Dragging the icon does nothing.
turnoff_2_with_arrow

Bonus: you don't have to drag the little screens all the way to the top of the screen to make them disappear, though that will work. The way I do it is I give the little screen a little flick. It is sort of fun to see how tiny a flick will still work. Dragging requires a lot more movement. Try a flick instead.

Double-Bonus: you can flick away two apps-- even three apps-- at once! Might take two hands to do it on an iPad but it can be done. This is another thing to impress your friends with.

Three at once. You can do it.
turnoff_3_three_at_once_with_arrows

In Case You Wondered

The reason we turn off unused apps is that they can use up battery power even when you're not actively using them. Apple's Maps app is particularly battery-hungry. If you use Maps, turn it off when you arrive. Otherwise, by the time you leave, your iPhone's battery will be surprisingly low. This goes for iOS 6 too: turn off Maps when you're done with it. If you're thinking that turning off Background App Refresh in iOS 7 should take care of it, you'd be right, it SHOULD-- but it won't. So you have to turn off Maps (and other Apple apps) manually.

Katie Moss of
Katie Moss Landscape Design wins the Coffee Cup for being the first to ask this question. Congratulations Katie.
cba_coffee_cup

MMS iPhone Update

MMS: noun. Abbreviation for Multimedia Messaging Service, an enhancement to the SMS (Short Messaging Service). In English: with MMS, you can still "text" someone, but now you can send a picture, or a video, or a sound.

This feature was part of Apple's 3.0 upgrade a few months ago, and lots of people have been using it ever since-- except not in the United States, where AT&T couldn't get its network ready in time. AT&T is ready now, and you can start using MMS today. Unless you're using an original iPhone, in which case you can't. Sorry about that. Those are AT&T's rules.

Here's what you need to do.
  1. Connect your iPhone to your Mac with a cable. iTunes should start automatically. (If it doesn't, launch iTunes yourself)
  2. Click on your iPhone in the left-hand pane of iTunes.
  3. Look for an "Update" button. Click it.
  4. You will probably see a window like this one:
update to the carrier settings dialog box
Click Update Settings, turn off your iPhone, turn it back on, and you're ready to go. (The turning off and turning on is very important.)

After the restart, start the Messaging app, as if you were going to text someone. You'll see a camera icon next to where you type-- that's new. If you touch it you'll get a chance to use the camera to take a photo or video, or to choose an existing photo (or video). You get to write a note to go with it, and then you can send it. Yay.

Too bad that it doesn't always work the way you want it to. What you're expecting, I imagine, is that the person on the other end gets your message, complete with photo or video. A lot of the time that's exactly how it will work. Sometimes, though, it won't. The reason: the person on the other end doesn't have a new enough phone. How are you supposed to know what kind of phone the other person has? Beats me. Luckily it doesn't really matter because you can always use your iPhone to send pictures via email, just as you've been doing all along. But, if you know the other person has a modern phone, MMS can be sort of handy. And fun.

iOS 8 Tip #4: Faster Typing, Thanks to the Predictive Keyboard

Eight for 8: An iOS 8 Tip a Day, 8 Days in a Row (Day Four)

Listen to this blog post!

Eight for 8 logo 228 day 4d

Eight for 8, Day Four.

iOS 8 Tip #4: Faster Typing, Thanks to the Predictive Keyboard

iOS 8's keyboard looks a lot like its predecessors, except now it has a little strip across the top row. It uses that strip to present its three best guesses for what you want to type next. Tap a guess to squirt the word right in. It takes a little getting used to but it's worth it as it's way faster to tap on a guessed word than it is to type the word yourself. It's built into the system so it works everywhere you can type.

It's easy to overlook the Predictive Typing feature, and also easy to under-appreciate it by not understanding how sophisticated and groovy it is, so I am here to help you.

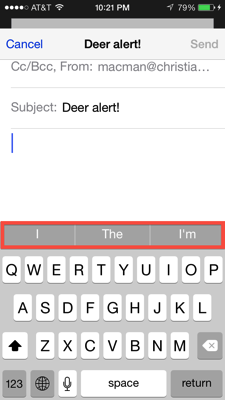
In the email message below I wanted to type "I saw two deer yesterday while driving home from Malibu." In the first picture, you see (boxed in red) iOS 8's best guesses for how I'm going to start my email.

Predictive keyboard 01

I didn't gain anything by tapping the suggested word "I" rather than typing it on the keyboard. In fact, for the first few words, the Predictive Keyboard didn't save me any typing at all. I had to type every letter of "I saw two deer" all by myself.

But then--

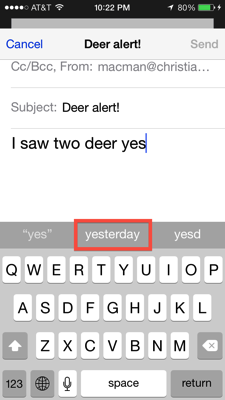
iOS 8 guessed "yesterday" after just three letters ("yes").

Predictive keyboard 02

Then it guessed "while" after "wh", "driving" after "d", "home" after "h", and "from" after "f". That's 34 characters (counting spaces between words) inserted into my message for 8 letters typed and 5 predicted words tapped. That's pretty good, and it's even better when you factor in the likelihood of me making mistakes had I typed the whole sentence myself.

Pretty neat. But it gets even better.

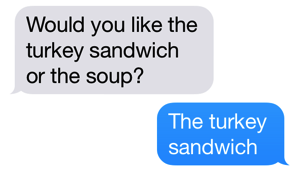
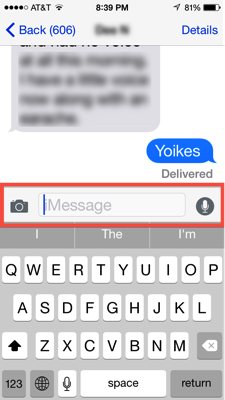
If you're using Messages, and someone sends you a question with choices, the Predictive Keyboard will present those choices as its best guesses. Look at this screenshot, where a HIGHLY VALUED customer is asking me what I'd like for lunch.

Turkeysandwich or soup

I should have taken a screenshot but take my word for it, I didn't have to type "The turkey sandwich." iOS 8 predicted it. "The turkey sandwich," "The soup," and "I don't know" were presented as choices across the top of the keyboard. (Note to iOS 8 Keyboard Design team: "Both" would be more useful than "I don't know".) All I had to do was tap "The turkey sandwich" and like magic, not only did the words appear but shortly so did the sandwich.

It takes a little training to remember to look at that strip of words across the top of the keyboard but it is worth it, so start using it now and you'll be great at it in no time.

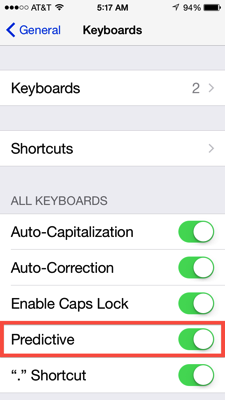
If the Predictive Keyboard doesn't appear for you, maybe you've turned it off. Look in the Settings, and then General, and then Keyboard, and turn it back on.

Predictive keyboard 04

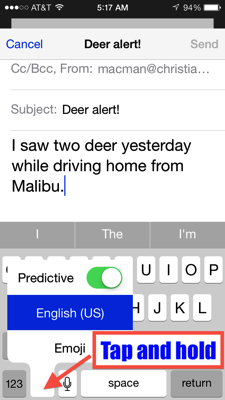
It's also possible to turn the Predictive Keyboard off (and on) from the keyboard itself. Just tap and hold on the "Emoji" icon (a happy face) or the keyboard switcher icon (looks like a globe) and you'll see how to switch Predictive on and off.

Predictive keyboard 05

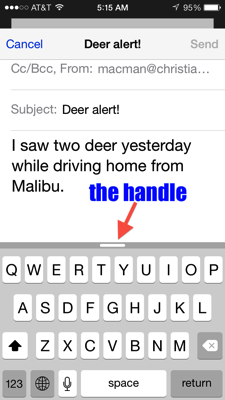
As you can see, you're not likely to accidentally turn the Predictive Keyboard off. There is a decent chance that you will accidentally hide it. Swiping down on the little Predictive strip will hide it, leaving a small handle. Swipe up on the handle to bring it back. See below.

Predictive keyboard 06

The iPhone and iPad save you a lot of typing, even without the Predictive Keyboard. There's auto-correction, dictation, and text-expansion shortcuts that you can define yourself. The Predictive Keyboard takes things up a notch, and it's well worth a try. It works for me and I'll bet it will work for you.

Links:

Friday, September 25, 2015

iOS 7: Stretch Your iPhone's Battery Life

heresatip_ios7

iOS 7: Stretch Your iPhone's Battery Life

UPDATE: Apple has found that the batteries in some iPhone 5 units drain too quickly. They'll replace those batteries for free. Read all about it on my post "iPhone 5 Battery Replacement Program."

My iPhone 5, with iOS 7, ran out of power today. I don't know exactly when but I know it was before 6 PM. That's not good. It's never happened before, but then again I never accidentally turned on Bluetooth (because it was almost impossible to do that accidentally in previous versions of iOS) and I also never had a feature called Background App Refresh that keeps some of the iPhone's apps up to date even when the phone's not being used.

Let's talk about these things.

First, Bluetooth.
If you're not sure that you need it, you probably don't. And even if you do need it, you probably don't need it all the time, so turn Bluetooth (and its battery-sucking antenna) off when you can. iOS 7's Control Center lets you quickly and easily access your iPhone's Bluetooth on/off switch, so now you can turn it off when you don't need it (such as when you're not playing music or phone calls through your car's stereo system, or not using one of those annoying Bluetooth headsets that irritate every person you call with lousy, choppy sound). iOS 7's Control Center also lets you quickly and easily accidentally turn ON Bluetooth, so watch out for that. I think I did that today when I went to Control Center to adjust my iPhone's brightness. (Remember: swipe UP from the bottom of the screen to access Control Center.)

bluetoothOn1

BONUS: actually, it's a whole lot easier to pull up the Control Center when you start your swipe below the screen. Also, you don't have to swipe up along the centerline of the iPhone-- try starting on either side of the Home button and swiping up from there. Impress your friends with your ability to pull up Control Center every time while they struggle. (Then give them the URL for this here blog.)

HISTORICAL NOTE: did you know that the Bluetooth wireless protocol was named after Danish King Harald Gormsson, who liked blueberries so much that his teeth turned blue? He was good at getting diverse peoples to communicate with each other. That's sort of what Bluetooth (the wireless protocol) was created to do, so lacking a better idea they named it Bluetooth. At least that's the story. Lucky for us he didn't like rainbow sherbet.

And Now, Background App Refresh
This certainly sounds like a nice idea: apps that need location data, or an internet feed, or some other kind of information, can update themselves even when you're not using them, so when you do use them they are already up to date. It's off by default, but the first time iOS 7 launches it asks whether you want it on or not and like a fool I said yes. (I like how they say "Turning off apps may help preserve battery life." Written by the same guys who came up with "Your mileage may vary." No kidding.)

BackgroundAppRefreshJPEG_1

and…

BackgroundAppRefreshJPEG_2

and…

BackgroundAppRefreshJPEG_3

and finally:

BackgroundAppRefreshJPEG_5

Luckily, nicely, Apple lets us turn off background app refresh on an app-by-app basis. For now, I've thrown the switch at the top, turning off background app refresh altogether. I might turn it back on for a very few select apps but I kind of think not. I'd rather preserve the battery's life than have everything instantly up to date. If you're having trouble keeping the battery alive all day under iOS 7 see if turning off Background App Refresh makes things a little better. Settings/General/Background App Refresh.

Thursday, September 24, 2015

iOS 8 Tip #3: Audio Texts and Video Insta-Selfies

Eight for 8: An iOS 8 Tip a Day, 8 Days in a Row (Day Three)

Listen to this blog post!

Eight for 8 logo Day 3

Eight for 8, Day Three.

Why do we say that half of eight is four, when anyone can look at the picture and see that half of 8 is 3? Must be the New Math.

Before we get to today's tip I want to thank those who've been sending in tips, questions, and thanks. Those kinds of interactions really make my day. Keep 'em coming.

And now, on with the show.

iOS 8 Tip #3: Audio Texts and Video Insta-Selfies

Yesterday I commented that Tip #2 (Actionable Notifications) wasn't as important as the invention of fire. Today's tip is. In fact, today's tip is like the invention of fire, the wheel, aspirin, indoor plumbing, and football on TV, all rolled into one. I'm telling you, you'll be using this tip a lot.

In a nutshell, today's tip is that iOS 8's Messages app lets you record and send audio and video messages as easily as you send text. Yes, you could send audio and video "texts" in older versions of iOS, but it wasn't as easy as it is in iOS 8, and I'll bet a lot of people didn't know they could do it at all. Now it's right there in the Messages app, all built-in and handy. Let's have a look.

Here's the Messages app, ready for me to type. Note the area boxed in red.

Messages app, iOS 8

In particular, notice there's a camera on the left, and a microphone on the right. Let's start on the right.

Note: for dictation we use the microphone next to the space bar. For audio recordings we use the one to the right of the text-entering area. Audio recordings are what we're interested in here.

When you tap and hold on the microphone it immediately begins recording your voice (so be ready to talk). When you let go, you'll see a screen like this one (you'll see something similar while you're recording):

Messages app, iOS 8, audio controls

Tap the up arrow to send it, the x to cancel it, and the play button to listen to it. I'm a little surprised at the crude appearance of the controls but they work just fine and I've had a great time sending audio messages in the couple of days that I've had iOS 8 installed.

I call these recordings "Audio Texts," sort of a catchy name despite not making sense. You can call them anything you want. If you think you've got a better name than "Audio Texts" post a comment here on the blog and let us be the judges.

Note: sending "Audio Texts" works best when you're sending to another iPhone (or iPad) user. If the recipient isn't using an iPhone or iPad (and thus, not using iMessage) your audio might go through anyway but I wouldn't bet on it. When you're going iPhone to iPhone, or iPhone to iPad, you're using Apple's iMessage system, and in that case everything is going to work.

I could end right here and you'd get your money's worth. But I'm in a giving mood.

The second part of this iOS 8 tip is what I call "Video Insta-Selfies." "Video" because it's video. "Insta-" because it's instant and it makes me think of Instagram. "Selfie" because it's a selfie. Yes, I invented this name.

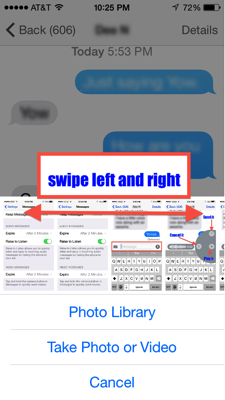
Video Insta-Selfies are a lot like Audio Texts, except they're video. The controls look a lot like the ones for Audio Texts but in fact they work rather differently. For example, tapping the microphone gives you instructions ("Tap and hold to record and send audio"), while tapping the camera gives you choices: pick a recent photo from a gallery, go to the Photo Library and choose an older photo or video, or take a new photo or a video. See below.

Messages 03

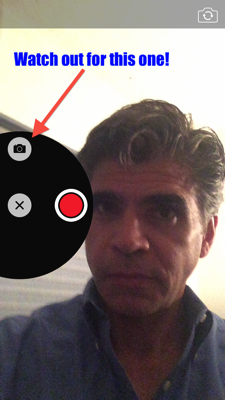
If you tap the camera icon you get the picture above. If you tap and hold the camera icon you get a screen like the one below (late-night blogger not included):

Messages in iOS 8, video

Tapping on the red button starts a video recording. You can switch to the "back camera" using the camera icon at top right, as you can any time you're using the camera. The icon I'm pointing to with the red arrow will snap a photo and send it immediately-- no opportunity for you to review the picture or think it over-- so be careful. At the very least be sure you're sending it to who you think you're sending it to.

Assuming you do make a video recording you will then get a screen like the one below, which lets you send it, review it, or delete it.

Messages in iOS 8, video

Before you run off to Audio Text and Video Insta-Selfie Land, give some consideration to how much space these recordings take up. Luckily, Apple's looking out for you here: in the Settings, in the Messages section, you'll see something like this:

Messages in iOS 8, Settings

If you tap the places where it says "Expire After 2 minutes" you'll see an explanation that iOS 8 is set to delete audio and video from your Messages conversations in 2 minutes. Probably a good idea to leave it that way.

And that's iOS 8 Tip #3.

Links:

Wednesday, September 23, 2015

iOS 8 Tip #2: Actionable Notifications

Eight for 8: An iOS 8 Tip a Day, 8 Days in a Row (Day Two)

Listen to this blog post!

2 eight for 8 logo 228

Eight tips! Eight days! This is Day Two, so let's get down 2 it.

iOS 8 Tip #2: Actionable Notifications

In the olden days (that is, before last Wednesday), if someone texted you, and your iPhone was locked, you'd have to unlock it and go to Messages if you wanted to reply. Similarly, if you were doing something else on the iPhone-- maybe reading your mail, maybe buying an app, basically doing anything other than texting-- you had to stop doing what you were doing, leave that app, and open up Messages in order to respond.

Not anymore.

In iOS 8, notifications are actionable. That means that after they do their jobs (notifying you), you can take action... right then and there. Basically the notification becomes a little mini-app, on top of the lock screen or on top of the app you were using. Pictures will help explain it.

Here, my friend Bob has sent me a text message while my iPhone is locked.

Message on lockscreen

I could unlock the phone and bring up Messages and write Bob back, just like I used to. In fact, that's what I started to do here (because I haven't gotten used to being able to respond to a notification without unlocking the phone). Rather than "try again" on the Touch ID, the proper move is to put my finger on the text message and push it from right to left. You'll see something like this when you try it:

Message slid to left

A tap on the big blue Reply button brings us this:

Reply to message on lockscreen

I can type my reply, tap Send, and away it goes, all without having to unlock the phone.

It's even handier when you're actually doing something when the text comes in, such as using the calculator as shown below.

Message on calculator

All I do is tap Reply and without ever leaving the calculator I can type my reply and send it.

Reply to message on calculator2

I used texting as an example here but there are all sorts of other notifications that pop up on your iPhone's screen and all of them, in iOS 8, have the possibility of being "actionable" without requiring you to unlock the screen or to leave what you are doing.

It might not look like such a breakthrough feature, but not having to unlock the screen (and not having to leave what you're doing) saves a whole lot of tapping and a whole lot of time. It's not like the invention of fire but it does make a difference and small improvements like this add up.

Links: