Showing posts with label Glaze. Show all posts

Thursday, May 15, 2014

Cafe Paris~ Inspiration! Camera+ ~ Artista Oil~ Artista Sketch ~ Glaze ~ ImageBlender ~ Snapseed


Last week I had the great pleasure of working with a client who wanted to master GLAZE and do some iPhone work. Their home is like a large studio with white walls, soft white sheer curtains and beautiful windows with lots of natural light. As I worked with my client my eyes were just seeing small still life vignettes everywhere! So we used the natural light and set up a few stills to process on the iPhone. This was one of them. The beautiful china cream pitcher with Cafe Paris on it by Bernardaud and the blue checkered breakfast napkin, just begged to be photographed, so I arranged a little comp by the window with the soft drape of curtain behind it.We placed a white foam core board behind the curtain to balance the interior light.
Staring with Camera+ and choosing an appropriate exposure using the lock exposure feature we made a few comps. I liked this one.

1. Original capture using Camera+
                                        
2. To begin the processing, I brightened it a bit and used a warmer  White Balance in Snapseed. Then I wanted to add a bit of color to the edges. I used Artista Oil to accomplish this by reducing all the slider effects except the border and then toned  the border to work with the blue in the napkin.


3. Next I wanted to add a bit of color to the comp.
I used Artista Sketch to accomplish this, by choosing a sketch look I liked and changed the sketch color to yellow which I thought would work nicely with the blue of the napkin and china.


4. To the original image #1, I blended in ImageBlender image #2 to soften the effect of the blue border toning.


5. Next I blended image #3 with #4 in ImageBlender choosing an appropriate blend mode to achieve the look I had in mind. Then I ran that blended image through Glaze and achieved the look in this image.
6. To finish off the image I used Snapseed and boosted saturation and sharpness as well as applied the border. I used Impression to add my copyright and toned it blue to match the image.
 Check out my full list of classes on the Capital Photography Center site click here for more information and registration.


Wednesday, April 16, 2014

Whats your Muse? Apps~Hipstamatic ~ Glaze ~ BracketMode ~HDR Pro~ Leonardo ~ Snapseed

Often, I ponder what it is that moves me to see and then create an image......waxing introspectively....
On my recent workshop at The National Gallery of Art, men inspired me, doing what they do in this beautiful environment...as I was working with the group explaining BracketMode and HDR Pro I spotted this gentleman with his camera. I was curious about this older man walking around the gallery putting his camera to his eye and shooting images...at any age photography is a gift and a camera a good companion! I quickly grabbed a BracketMode shot while he stood still looking at the tree with his camera to his face. BracketMode allowed  me to capture the light inside with detail on the wall, as well as the beautiful light falling on the outside building wall. I wondered what image he made....
Captured: BracketMode Processed:HDRPro, Snapseed
After the workshop was over I found him in another section of the gallery and made this image. Waiting until I found just the right composition which allowed me to fit him in between the two paintings hanging on the wall. He was alone with his camera, his thoughts and marvelous art!
Captured: Hipstamatic, Jane lens Inas 1969 film Processed: Glaze, ImageBlender, Leonardo, Impression
The same day one of my young students, who I was terribly impressed with....captured my "Yes" when I saw him holding his iPhone up to capture the condensation of the perpetual condensation display....and once again...the joy of photography came to mind...from the very young with his iPhone to the older gentleman with his DSLR. Amazing....how we see so differently through the lens!!! any lens! and the joy it brings.
Captured: Hipstamatic, Jane Lens Inas 1969 film Processing: None
While showing a workshop student a composition using Hipstamatic, of a man seated, seemingly as part of the stone building structure, an art object himself, we got down low and and made this composition. He never knew we were there.
Captured: Hipstamatic Processed: Glaze, ArtistaSketch, ImageBlender, Snapseed, Leonardo
And after the workshop I strayed into the West wing and captured the Gallery Guard as he was directing traffic and warning people to put their beverage bottles away, again, waiting to catch him in a position separated from the escalator so that he was in a good position to offset his person against the wall in front of him, and waiting for that crossed hand behind the back stance that caught my eye initially.
It is always fun to shoot with the iPhone, then app it up! I have only two spots left for my all day workshop sponsored by Capital Photography Center on May 4th. Hope someone can join me there. For more info Click Here. My next "Getting Started" class is June 1 at the National Portrait Gallery for more info click here.
Captured: Hipsatmatic Jane Lens Inas 1969 film Processed: Glaze, ImageBlender, Snapseed, Leonardo, Impression


Sunday, March 23, 2014

Polamatic~Camera+~Glaze~PhotoArtistaSketch~ImageBlender~Leonardo~Phonto~ Working up a new process

Finished Image My Process Below.....
This image started with a simple grab shot of a little flower arrangement on a table at Chick-fil-a when I was killing some time before a Camera Club meeting I was judging. The process evolved as I was working through a few of my favorite apps and one I recently bought Polamatic. The process steps I took are in order below.
1. Camera+ original capture
2. Saturated in Leonardo
3. Image 2 opened in Polamatic and Filtered in Polamatic
4. Image 3 opened in Glaze and masked using the in app purchase mask feature.
5. Image 3 Glazed. Notice the cool effect of paint drips over the masked out border
using the workshop mode in Glaze to achieve a custom Glaze effect..

6. Image 5 opened in PhotoArtista Sketch with sketch effect reduced to
zero so that the paper texture is totally visible, almost completely obscuring the image file.
7. Image 5 and image 6 Blended and selectively masked in
ImageBlender for an aged paper look.

8. Image 7 adjusted for sharpness, saturation and brightness in Leonardo, then opened in Phonto to add the text.
Join me May 4th in Washington, DC for  my full day of Working with Apps in Depth class sponsored by Capital Photography Center where we will process images with cool apps like the ones used here! For more information and registration click here.


Thursday, March 13, 2014

Glaze ~ Transparency Masking ~ ImageBlender ~ BrushStrokes ~ Camera+


1. This is the iPhone image I started to work with in Glaze for the purpose of exploring the mask feature in Glaze. The image was captured with Camera+ with Square crop mode activated and  I had already processed the image with BrushStrokes a newly released App.
About 5 months ago the developers of Glaze added a new masking feature to their app Glaze. In order to access the feature it required an in App purchase so, I purchased it. I really did not have the curiosity to explore the options at that time as I was using ImageBlender, but this Glaze masking feature allows you to accomplish a different process when using the App Glaze with mask mode...so here it goes my attempt to explain its features and benefits as well as some ideas for improvement.
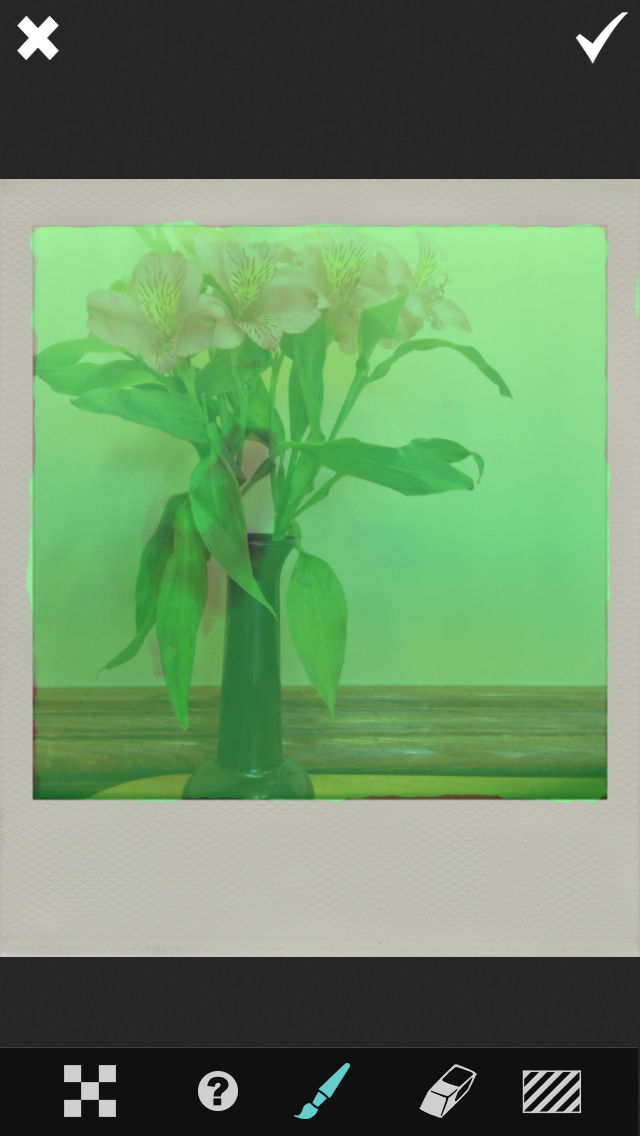
2. Image being masked in mask mode in Glaze.
To select the areas to be masked one paints over the image area with the Brush Icon activated, it is easily seen by the bright green mask.
After purchasing the mask feature a star icon will appear at the bottom of the paint style palettes upon opening the application. When you tab on the star the menu choices appear as in the image 2 above.
3. Transparent mask applied to background of the image.
The cool thing about this mask is that you can save it with a transparent background. To do that you activate the transparent background by tabbing on the checkerboard icon. In order to work in great detail you simply expand the image and the brush becomes smaller relative to the enlarged image There is no brush size or opacity adjustment. The eraser feature works the same way. I woud like an undo button but it is easy enough if you over paint to erase. The one button you do not want to actidentally activate especially after you have spent time painting your mask is the diagonally striped rectangle on the bottom right, it will clear your mask! I wish there was a prompt connected with that saying are you sure you want to clear the mask?Now that you have the mask on a transparent background, you can hit the checkmark in the lower right. This will activate the mask and you can now run it through your favorite glaze filters.
4. Masked image area processed with a Glaze filter with a transparent background.
Notice the star icon changed to reflect a transparent background.
So here is what happens when you process the  mask with you favorite Glaze filter, it applies it to the masked area only...pretty cool!
5. Saved image to camera roll, masked and Glaze processed with transparent background all ready for blending with another file.
The image above is what the saved, transparent masked image looks like in your camera roll.

6. Blended images, the original BrushStrokes image 1 and the Transparent Glaze image 5
This is an image blended in ImageBlender using the original processed image from BrushStrokes  Image 1 and a variation of the Masked Transparent Image 5. When you use the transparent image in ImageBlender there is no further masking required.
7. You can also choose not to use a transparent background using the mask feature and run your image through a Gazed filter right out of the mask feature and Glaze will only apply the Filter to the mask leaving your background in the image.
So five months later, I will say this is a pretty trick feature in Glaze!!! If you would like to work with me on this process, join me on my next day long iPhone workshop, "Working with Apps in Depth" May 4, Sponsored by Capital Photography Center. Click here for more information and registration. Happy Masking!
Depending on the Glaze filter you use the background will change, this is a variant to the image process without the transparent mask activated.


Sunday, November 3, 2013

Trees: Hipstamatic Classic: Glaze: Leonardo: ImageBlender


It has been a beautiful fall week with the trees really showing their colors. I have been gathering a collection of colorful tree images from my iPhone. While working with Glaze in workshop mode I have developed a filter that I like for trees...it reminds me of a style of painting called Pointillism made popular by Georges Seurat...and yes it is a form of Impressionism which I love so much!
I also updated to iOs7 and I definitely see a purple tint in some images. The update went well after sorting off 2000 images from my iPhone and backing up the computer...updating all the apps that needed updating, then updating to iOs7. If you are one of the 30% that have not yet updated, click here for some tips before updating.
After updating, I had to change the home screen background and found that using a burgundy background allowed me to readily see the names of my app folders, which I found hard to do with the new design of the app folders. Then I immediately followed tips on saving battery power that were published...click here for a good list. Then I started to find the new features...Click here for a list of what you can now do with the updates.
Now heres a few more trees! I love fall! I hope you have been enjoying it where ever you are!
My  next "Getting Started" in iPhone photography workshop sponsored by Capital Photography Center is November 17 in Baltimore, click here for more information.
Also I will be doing an all day iPhone photography workshop "Working with Apps in Depth" in Washington, DC on November 24. Click here for more info and registration.
And.....I will be in Chestertown, Maryland on Saturday November 23 at the Chestertown River Arts for an all day iPhone photography workshop "Working With Apps in Depth"..click here for more info and registration.


Sunday, October 27, 2013

Hipstamatic Oggl~ Now you can create an HDR with your favorite Hipsta Combo!


Image Capture: Hipstamatic Oggle Processing: Pro HDR, Glaze, Leonardo, ImageBlender
When the folks at Hipstamatic launched Hipstamatic Oggl in May of this year, I passed it by; thinking, Why would I want to pay for a subscription on an iPhone app? (It is only $9.99 a year) But now it has been through several version updates, with the most recent one on October 17 and it is packed with goodies! You can import all your existing Lenses and Films from Hipstamatic Classic, you can control exposure, you can swap filters, you can share with the Oggl community, you can import images from your camera roll and apply Hipstamatic filters and now you can create a High Dynamic Range (HDR) Hipsta image with a little creativity and a tripod mount. (If you are a classic Hipsta shooter, how many times did you wish for control over exposure? Well Oggl delivers it now.)  As far as a tripod mount: Kirk makes a cool tripod mount that fits its regular tripod plate here is a link for it: Click here: but there are others, its just really important to keep the iPhone still and in the same position when making the two bracketed images.
Here is how I created a Hipstamatic Oggl HDR image...I was playing with Oggl, with my iPhone mounted on my tripod at Longwood Gardens on Saturday. It was a bright, windy, sunny, contrasty but beautiful fall day. I wanted to capture the sky and shady areas in the landscape. So, I thought, now that you can choose an exposure point in Hipstamatic Oggl, I did and made an exposure for the sky, which of course threw the ground and shady areas into almost complete darkness. Then I made an exposure for the ground and shady areas which blew out the sky! Perfect! Now I had the two Hipstamatic images I wanted to blend together in Pro HDR by eyeApps LLC (ProHDR has not done an update for iOs7 but seems to work fine)...It worked!!! here's the proof! So now I would recommend purchasing Hipstamatic Oggl! Its Hipsta Classic on Steroids!
Here are the files I used to achieve the opening image. For both sets of image files I used Ina's 1969 film and the Jane lens.
 
Exposure made on tripod and created to capture details in the shady area, which blew out the sky.

Exposure made on tripod and created to capture the sky color, which threw the areas in the shade into darkness.
Combined image in Pro HDR
So because I could I made another image in the same way. Here is the finished "Glazed" image and the shots I used to get to the final image.
Captured for detail in the shady areas, sky blows out.
Captured for the color of the sky, shady areas go almost black.  
Combined previous two images in Pro HDR
Processed in Glaze and enhanced in Leonardo for final image.


Saturday, September 14, 2013

Beach Color Palettes ~ iOs7 ~ Hipstamatic ~ Glaze ~ Snapseed ~ Leonardo

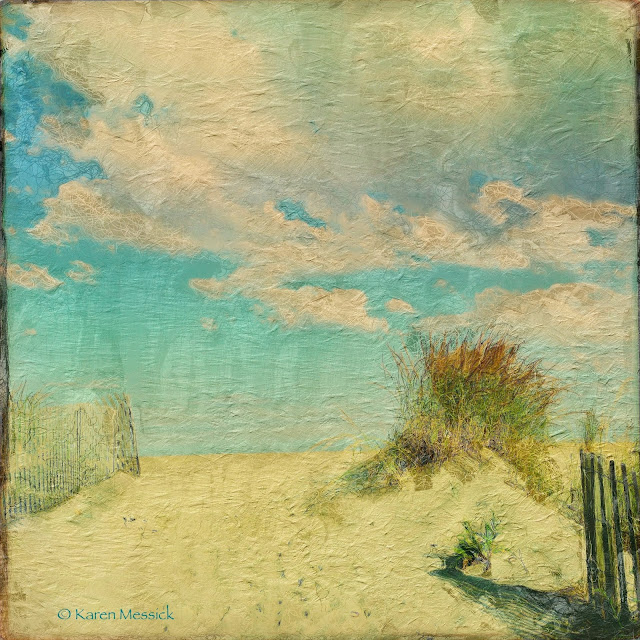
Dunes: Processed Snapseed, Glaze, ImageBlender, Leonardo, Impression (signature)
This morning I took the big camera out to shoot my last sunrise at the beach for a couple weeks. It was a bland sunrise so to speak, no clouds...or drama in the sky. I had my iPhone with me using it to time the long exposures pre-dawn for the big camera shots. I also made a couple shots with the iPhone after I was done with the big camera. I must admit walking around with the big camera on my back, tripod collapsed and iPhone in hand was a bit more fun! Call me crazy it just is: Something about the flexibility of moving the iPhone any which way you want so easily to get the shot. I am sure if you are an iPhone shooter you can relate!
iOs7~ Is now live and I am waiting for the apps to catch up before updating my iP5 to the new system. A few Apps posted updates this morning. It sure makes an iPhone educators job difficult when Apple updates their iOs and the App developers have to scurry to update...so I wait....instead of risking incompatibility of my favorite shooting and processing Apps. I just issued a note to students who have enrolled in fall courses not to update until the courses are over due to uncertain compatibility! Geez! OK, now back to the fun stuff!
Beach Color Palettes~ Daytime: Turquoise and yellow
I am loving the Square Format right now so I have enjoyed using the Brighton Hipsta Pak which is the Doris lens and Sussex film in bright afternoon and daytime light at the beach. It adds to the yellow blue palette already at the beach with a twist of turquoise and a touch of the nostalgic feel of vintage hand colored postcards.
The three images below and the opening image were made using the Brighton Hipsta Pak.
Surf : Processed Snapseed, Glaze

Beachscape: Processed Snapseed, Glaze

Landscape Color Block : Processed Snapseed, Glaze


Beach Color Palettes: Sunset: Purples, pinks and blues
For this color palette I like Hipstamatic Jane Lens and Inas 1969 film.
Tidepools: Processed Snapseed, Glaze, Leonardp

Sundown Tide Pool: Processed Snapseed,  Glaze, Leonardo

Beach Tide Pool Walker: Processed Snapseed ~ Straighten, and framed, Glaze

Beach Color Palettes: Sunrise: Gold and Blue
I have no idea what I am going to do with all these little beach pictures, but I have had fun making them...and I think thats what it should be about anyway!! 
Sunrise Surf: Processed Snapseed, Glaze, Leonardo

Sunrise Tide pool: Processed Snapseed, Glaze, Leonardo