Eight for 8: An iOS 8 Tip a Day, 8 Days in a Row (Day One)
Listen to this blog post! If you'd have asked me, I would have said "No, I wouldn't recommend installing iOS 8 on the first day. Wait for Apple to iron out the wrinkles." But some of you didn't ask me, and some of you that did ask me went ahead and installed it anyway. Actually, I did too, not because I don't think my advice is any good but because I have to stay one step ahead of you. So now it's installed, and I'm here to tell you about the coolest things I've found in iOS 8 so far. You'll get one iOS 8 tip a day, for the next 8 days. Today is Day One.
First let me tell you about the installation. I installed iOS on an iPhone 4s, an iPhone 5s, and an iPad 2. iOS 8's performance on the 5s was great. Performance on the 4s was a little sluggish. Performance on the iPad 2 was terrible-- rather gooey, not snappy at all. But, overnight, the iPad's performance improved. I think that post-installation there was a lot of rearranging and optimizing taking place behind the scenes. I don't know that for a fact but I did notice a little spinning wheel at the iPad's upper left, near the WiFi signal strength, immediately after the installation. During my initial testing with the iPad 2 the wheel was spinning and performance was lousy. Now, a couple of days later, the iPad 2 seems just as fast with iOS 8 as it did with 7. Take a lesson here: if you're not happy with the performance of your iPad 2 after upgrading to iOS 8, leave it on and give it time to sort things out. You might be pleasantly surprised.
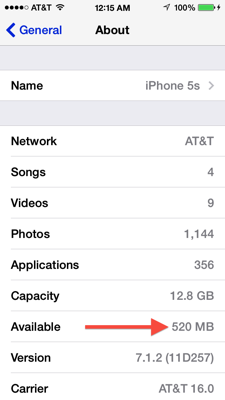
One more thing about installation. Take a look at this screen shot, taken before installing iOS 8 on my iPhone 5s. Obviously I was a little short on space.
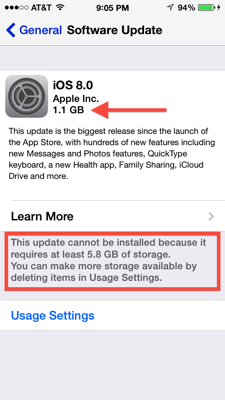
Now look at the amount of space Apple is asking for in the Software Update section of Settings.

The red arrow points to the size of the update: 1.1 GB. But the text in the red box says I'll need 5.8 GB of storage in order to install it. With a 16 GB iPhone 5s there's no way I'd ever have 5.8 GB to spare. So, according to this screenshot, I shouldn't have been able to install it. And if I had insisted on doing the upgrade "in place" (that is, over WiFi, through the air), I would not have been able to do it.
The reason Apple needs all that room is simple. Contrary to what you might think, the update doesn't come in from Apple's servers and install itself as it downloads. Instead, an installer program is downloaded from Apple's server, and it's stored on the iPhone itself. After the installer is completely downloaded (and stored on the iPhone) the updater runs and updates things (which takes more space than you might expect, because the only safe way to do it is to keep copies of things that are being updated, in case something goes wrong), and then, finally, when it's all installed, the installer the copies of things that it made along the way, and finally it deletes itself.
So how did I manage to get iOS 8 installed, if I didn't clear 5.8 GB on my iPhone? Easy: I did the installation through iTunes, not through the air, connecting my iPhone to the Mac with a USB cable. In that situation, the iPhone gets backed up to the Mac, then the updater is downloaded to the Mac's disk (not to the iPhone's storage), and then the iPhone is completely wiped out, and then the installer runs (from the Mac) and sets up the iPhone with iOS 8, and finally the back-up is restored from the Mac. I was able to do this even though I had only half a gigabyte of space remaining on my iPhone. Believe it or not, after the update to iOS 8, I now have more space on my iPhone. Winner winner, chicken dinner.
Executive Summary: if you're short on space, connect your iPhone to your Mac with a cable, do a backup, transfer purchases if you're told to, and install iOS 8 that way.
And now... our first iOS 8 tip!
iOS 8 Tip #1: The Two-Finger Down-Swipe
In iOS 8, if you swipe down with two fingers your iPhone (or iPad) will speak whatever text it finds. For some reason, this feature is turned OFF by default. We are going to turn it on. Go to...- Settings
- General
- Accessibility
- Speech
Tap on Speech and turn on "Speak Screen." You can tap on Voices and choose what sort of accent you want to listen to.
Here's the best part: they call it "Speak Screen" but it's really "Speak everything in the document." So you don't have to scroll down a screen and repeat the two-finger swipe just because the document is more than one screen long. With Speak Screen turned on, all you have to do is swipe down once (with two fingers) and the iPhone will read until the end of the web page, or the end of the email (or the end of whatever). This is perfect for those long emails you get every now and then, and also great for those meaty feature articles you'd love to read if you only had the time. Now you have the time-- listen to those articles while you're driving, or while you're washing last weekend's dishes, or while putting away your socks. I can tell you from personal experience that it works great in all three situations.
Note: it's a lot easier to do the two-finger down-swipe if you start with your two fingers a little higher than the top of the screen.
When you do the two-finger swipe you'll see a little overlay at the top of the screen. It looks like this (here I was listening to a terrific blog post in Safari):
Tap the turtle to go slower, tap the rabbit to go faster, tap the "x" to stop it and to make the overlay go away. Tap the "<" to collapse the overlay into a little button, or just wait for it to happen automatically (tap the collapsed button to expand it again). This is easy stuff. You'll be an expert the second time you try it.
In my experience it sometimes takes a few seconds for the overlay to appear after my two-finger swipe. And, also in my experience, the quality of the voice from SoundGecko is better than the one built into iOS 8. But Speak Screen works just about everywhere, while SoundGecko only works on web pages, and besides, how many people take the extra time to provide SoundGecko "Listen to this blog post!" buttons on their web pages? I only know of one. Use SoundGecko where you can, and the two-finger down-swipe everywhere else. I'm telling you, try it once and you'll be hooked.
Links:- iOS 8 Tip #1: The Two-Finger Down-Swipe
- iOS 8 Tip #2: Actionable Notifications
- iOS 8 Tip #3: Audio Texts and Video Insta-Selfies
- iOS 8 Tip #4: Faster Typing, Thanks to the Predictive Keyboard
- iOS 8 Tip #5: Hands-Free Siri
- iOS 8 Tip #6: See the Battery Usage, per App
- iOS 8 Tip #7: Set the Camera's Focus and Exposure Independently
- iOS 8 Tip #8: Make and Answer Phone Calls From Your iPad